

27 Feb 2008 3:34 PM
Multisite functionality is the hugest and long wait functionality which will help you to build any number of sites using one data base. There are different settings for multi-site functionality and a lot of opportunities you can play with. Let's take a closer look at the steps necessary to activate a Multi-Site functionality for two sites. Shortly, we’ll add detailed instructions on the functionality to our online manual.
So, to setup your Multi-Site functionality, please follow the steps below:
- Make a copy of your current shop on your server and give it another name. Therefore, you should have two shops with different names, like: shop 1 and shop 2.
- Copy var_definition.php file from your shop and paste it to the 'includes' folder of your second shop to save the data of your DB.
- Now go to the Admin console of your shopping cart (Administration > System > Privilege Groups > Administrator > Edit Permissions) and activate the appropriate Multisites Permissions. This step is extremely important, otherwise you won’t be able to start sites configurations.
- When doing this, you will see the Sites Section in the System menu at once. Click the Site Menu and add the second site by pressing the New Site link. Give the name to your second site and select whether you want to duplicate the Page and Global settings of your first site or not.
- Further important step is to set the correct site URL for each of the site. To do this, please go to Administration > System > Global Settings, select Current Site from the drop down box in the upper right corner and set the URL for this site like: http://www.yoursite.com/shop1. Then select the second site and specify the URL, like: http://www.yoursite.com/shop2. If you are using SSL for your shop, then you should change the SSL site URLs as well, like: https://www.yoursite.com/shop1 and https://www.yoursite.com/shop2.
Please, also note that you should decide at once whether to use MD5 Password encryption or not, because the method you select for one site will be automatically applied to all your sites. - The next step is to add your site IDs to the var_definition file. For this open the var_definition file for the first shop and insert the below string under the line: $session_prefix = "";
$site_id = 2; You will see the correct site ID in the browser's bar when selecting this or that site. Save the file and add the same string in the var_definition file for your second shop. - So, the general settings are done and now you should attune your shop to display products on your two sites. Please ensure that you set the appropriate permissions for the category. Further, select the first site, for example, and go to Administration > Products and Categories. Select a Category and click the Edit link. You will see the Sites tab there. In case you want to use this category for all your sites you can tick off the 'Use this category for all sites'. In case you are going to use the categories for selected files, it is recommended to leave this option unticked and select the sites where you want this category with products to be displayed. Then this category will be shown only for the selected sites.
- You can also select to show a particular product on different sites. This is done on the Product Edit page (Sites Tab).
- If you need to assign different customer groups to different sites, go to Administration > Site Users > Profile Settings >, select a particular type and click the Edit Type > Sites tab. Select on what sites to display this customer group from the list of available sites or tick off the 'Use this user type for all sites. Then this customer type will be displayed on all your sites.
- There are several other settings to attune Multi-Sites functionality for Forum, HelpDesk, Manuals, Articles, etc. If you need our further guidance, please let us know.
Now your ViArt shop is capable of exporting your products to Google base by activating appropriate settings. Google Base is an online database which allows any user to add his products and any type of content in such formats as XML, PDF, Excel, etc. To know how to configure Google Base in your shop please follow the instructions below:
- Go to Administration > Products Settings > Google Base Settings tab.
- To submit your items to Google Base you should have a Google account. If you do not have a Google account yet, please click the 'Create new data feed' link and you will be redirected to Google site.
- Complete your profile. For the Website URL specify the correct URL of your site so importing works correctly.
- Click to save data and proceed to the next page.
- Specify the file name you will be used for exporting products to Google Base and then fill the same file name in the ‘Data Feed Filename*’ field in the shop settings.
- Further, select Item type as Products on Google site as it is the only type that is currently supported.
- Click the register Data feed button. You can skip the next page and then press ‘I’m done data formatting’ and you are getting to your bulk uploads page.
- Return to the product Settings and fill the necessary fields. Please note that the data you specify in your shop settings should be the same as the ones you filled while opening the account. Otherwise, Google base feature won't work correctly.
- When the main settings are done you can now export your products. Go to the products page and press either 'Google Base export' or "Google Base Filtered' link to create a file for uploading.
- Once you're done creating your file, you are welcome to upload or update it at any time from your data feeds management page. Wait a long while for Google to consume all of your content. Usually, it can take from 20-60 minutes, however sometimes this procedure can be extended on a few hours.
- For more information on Google Base feed, please visit: this page
This release features another sophisticated feature, namely: the possibility to add blocks on each page of the shop, including checkout pages. The long waited and frequently requested coupon block can be added to the Checkout Personal Data page as well.
In addition, we have slightly refined the templates update procedure. From this version we recommend you to create a separate folder for the templates you have made changes to and put the modified templates there. Then select this folder as the Templates Directory * for the active layout. When doing the upgrade the system will consider this directory as default and will take your custom templates as active. If it doesn't find an appropriate template it will take the templates from the standard user folder and your site won't display any errors.
Alongside full CMS support comes one more important feature – adding filters for products and their options. To activate filters firstly set permissions to access filters from the Admin menu. When this is done go to Administration > CMS > Filters. Firstly, press the ‘New Filter’ link to create the Filter. After adding the filter you will see Filter Options link. Press it and Add a new option. Let’s attune filters for manufacturers for example. Type ‘Manufacturer’ in the ‘Option Name’ field, select Manufacturer from the Option type field and set the appropriate Option Values. The Value IDs should correspond to the IDs of your Manufacturer. When completing this, go to Administration > CMS > Site Layout > Products Listing Page and add your Filter block to any of the columns. Check the site.
At last, we have implemented the functionality a lot of our customers asked us to add in ViArt Shop. Please, note that you should be a registered user to be able to add a product to a wishlist. To display the Wishlist list on the user home page please go to Administration > Site Users > Profile Settings, select or create a new user type and tick off the ‘My Wishlist’ option on the Edit Page. You can also create Wishlist types. To activate them please set appropriate permissions via Administration > System > Privilege Groups and then add as many wishlist types as you want via Administration > Products > Wishlist types.
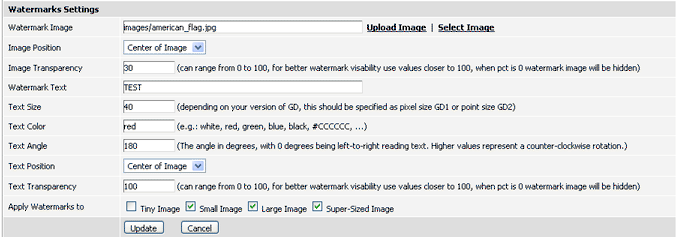
Now you have the possibility to create watermarks to protect your product images. To set watermarks please go to Administration > Products > Products Settings > Images Tab. Fill the necessary fields and your watermarks will be activated. Use the below image as a sample.
From this version you have the possibility to add custom fields for your support page (like you add on the order profile page). You will find the settings at: Administration > HelpDesk > HelpDesk Settings > Custom fields tab.
The new release enables to create custom friendly URLs for the default pages, like index.php. Please keep in mind that if you want to create custom fURLs you’re to activate general friendly URLs. In case fURLs are already activated, you can start with creating custom fURLs. For this go to Administration > CMS > Custom Friendly URLs, click the ‘Add New’ link and fill the necessary fields, for instance:
Script Name * - manuals.php
Friendly URL * - manuals
Press the ‘Add’ button and check your site. If you select to show fURLs with html extension in your Global Settings then when clicking the manual menu item you will see that the new URL will be manuals.html. Quite easy:).
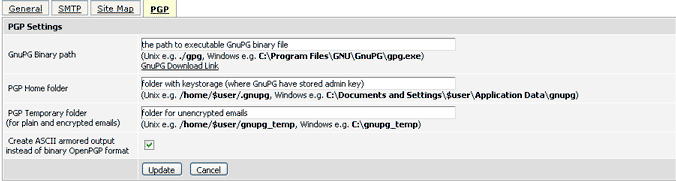
PGP encryption (short for Pretty Good Privacy) is a public key encryption program which allows to encrypt orders within your shop. To activate and test PGP encryption, please do the following steps:
- Download and install GnuPG on the server. You can do it from here
- Set the key for the admin email. For this please generate the key-pair for the admin notification email: gpg --gen-key. If you already have generated keys, then either import from file (gpg ?import) or import the key from the keyserver (gpg --search-keys admin@email --keyserver keyservername)
- Now the admin notification email should be in the keys list (IMPORTANT!) - gpg --list-keys.
- Further go to Global Settings Page and fill the appropriate fields. See the image below for more information:
- Note: For 'Create ASCII armored output instead of binary OpenPGP format' it is recommended to check first, but it has to be tested (on mail server, mail client etc). In case you fail to decode emails with the turned on ASCII output, then it is advisable to try a binary mode.
- Finally go to the Payment Details Page and turn on 'Enable PGP encryption' option for Administrator Email Notification.
- For more information on GnuPG, please visit: PGP site
Attention was also paid to improving newsletter sending. Now can upload the customized list of users to whom you are going to send the newsletter. Alternatively, you can use the textbox field to enter the e-mails manually. These options are available via Administration > Site Users > Newsletter > Add Newsletter.
You're encouraged to test new option to reserve/stock levels. Previously, if you set the status of the order to a cancelled or refunded it did not update the stock level of the items. You just had to delete the order. From now you can set the option ‘Release’ stock level for appropriate statuses (like Refunded, for example) and the stock level of your item will be added to the basic stock level. This option is activated on the Order Status Page (Administration > Sales > Orders Statuses).
In previous versions you were only able to allow posting products in a particular category for all merchants. Now it becomes possible to select a particular group. This option is activated via Administration > Products&Categories, select a category and click the Edit button. Go to ‘Post Types’ tab and select the user group(s) which you will allow to post their products in this category and apply this settings for all subcategories of this category.
This version is updated with one more important feature, notably with the possibility to add predefined prices and then set them for products. To add predefined type with price go to System > Static Tables > Price Codes and click the ‘Add New’ link. Give the title to this price code and specify the price that will replace the existing price while selecting this price code. You can add as many price codes as you want. When this is done go to the Product Edit Page and select the price code for any of price, like List Price, Discount price, etc.
Credit system is very much alike the points functionality with the basic difference that you award your customers with money (instead of points). Should you decide to grant any of your customer with the credit, you are welcome to do it via Site Users > Accounts. Click the credit balance opposite a certain customer’s name and press ‘Add Credit’ link. There are two options here: Subtract Credit amount from user balance and Add credit amount to user balance. Select either of this option and enter the amount you want to grant or subtract from this customer balance. You can also select either of this option in the Order status. In this case when changing the status to a different one, the credit amount will be either added or subtracted from the user balance.
Product and Order Coupons were updated with new discounts. The field 'Discount Quantity' for Product Coupon allows you to specify the number of copies of the same item to which the discount will be applied. For example, if you set a discount quantity as 3 and you have 4 identical items in your cart, then the discount is applied to only three first items. If you set a discount quantity as 3 and you have 6 identical items in your cart, then all six items are discounted (as 6 is divisible by three).
Minimum and Maximum Quantity fields allow you to set the minimum and maxumum quantities of the items to which the discount can be applied. In addition, for both Product and Order Coupons we have added a possibility to Auto Apply Coupon.
We've made it easier to copy options to products. Now you can select options and components which you want to add to the products, then choose to what products to add them and they will be added to all products you selected. It prevents you from adding options one by one to each product. It is time consuming. Moreover, you can delete the selected options and components from the product. Again, this feature is extremely useful if you want to delete several options at a time. It saves your time and efforts.
- New payment systems added: SIPS, ECHO. DGL, Moneybookers
- Possibility to restrict shipping methods by states and by users’ types
- Import orders facility
- Possibility to export only filtered products
- Allow merchants to post products to all subcategories of the particular category
- New forum option to change the priority of topic to show them first or last
- Different forum privileges by user groups. You will find the settings via Administration > Forum Threads > Forum topic
- Reminder functionality for site customers (is activated via Administration > Site Users > Profile Settings > Edit Type). You can also setup e-mail and notifications for reminder services at Site Users > Profile Settings > Reminder Service tab
- New email settings to send notification to merchants and administrators when a particular order status is changed
- A new field to sort option and component list values
- New templates email_basket.html and email_basket.txt for easy way of changing {basket} tag content
- New settings for options price display, like Large (+ $12.00) or Large [$12.00] or Large $12.00. The settings are activated via Administration > Products > Products Settings > Option & Components Price Appearance section
- New fields for currencies - number of decimals, decimal point, thousands separator
- Possibility to create a predefined list of options by different product types and then select to show the option or its values for a product with this type
- New option type 'Text Boxes List'
- Possibility to add selected options and components to particular products
- Dependendable product options
It is great that we are finally able to share a new version with you. We greatly appreciate your feedback as to new enhancements we developed for you!
With best regards,
ViArt Team.
|
||
|
||
|
||
|
||
|
||
|
||
|
||
|
||
|
||
|

