Description
In version 4.0 instead of columns appeared a new unit of measure - frames.
Frame is a term used to indicate a group of blocks.
DIV Frames are much more flexible than table columns - you have a possibility to create any layouts with your own blocks
positioning. Default CMS Layouts are: Three Columns, Two Columns, One Column and Hot Layout. Their settings are located in
CMS > CMS Layouts. To create a new layout we recommend to take one of the available default layouts and use it as example when creating
your own one.
In this tutorial we will illustrate the process of creating a new layout using for example a new Multi-Hot layout.
Example: Creating a new Multi-Hot Layout
Let's create a layout structure with two Hot blocks, one Hot block above, two usual columns below and a second hot block below them,
third column will be one frame stretching from header to footer. As a basis we will take the Hot Layout templates: 'templates/user/layout_hot.html'
and 'templates/admin/admin_cms_hot_layout.html'. Copy these files on your PC and name them, for example 'layout_hot_2.html' and 'admin_cms_hot_layout_2.html'.
Next:
- Draw a picture how you would like to position blocks, for example like below

- Using this sketch create a mockup of the admin template. The easiest way to do this is using a table structure:
<table>
 <tr>
     <td colspan="2">{header}</td>
        <td>{smallcart}</td>
    </tr>
 <tr>
     <td colspan="2">{hot}</td>
        <td rowspan="3">{right}</td>
    </tr>
  <tr>
     <td>{left}</td>
        <td>{middle}</td>
    </tr>
 <tr>
     <td colspan="2">{hot2}</td>
    </tr>
 <tr>
     <td colspan="3">{footer}</td>
    </tr>
</table>
Notice the figure brackets for frames {} - they are necessary so we could apply appropriate tags in CMS > CMS Layouts.
- Then we should create a template for the front-end where specify new styles for our Multi-Hot Layout frames, for example:
<!DOCTYPE html PUBLIC "-//W3C//DTD XHTML 1.0 Transitional//EN"
 "http://www.w3.org/TR/xhtml1/DTD/xhtml1-transitional.dtd">
<html xmlns="http://www.w3.org/1999/xhtml" xml:lang="{meta_language}" lang="{meta_language}">
<head>
<meta http-equiv="Content-Type" content="text/html; charset=utf-8" />
<meta http-equiv="Content-Language" content="{meta_language}" />
<title>{meta_title}</title><!-- begin head_tags -->
{head_tag}<!-- end head_tags -->
</head>

<body class="commonbg">

<div class="frameBlocks fourFrames2">
 <div class="headerStyle" style="{header_style}">
 {header}
 </div>
 <div class="smcStyle" style="{smallcart_style}">
 {smallcart}
 </div>
 <div class="contentStyle">
  <div class="hotStyle" style="{hot_style}">
   <div class="hotStylePadding">
    {hot}
   </div>
   <div class="leftStyle" style="{left_style}">
    <div class="leftStylePadding">
     {left}
    </div>
   </div>
   <div class="centerStyle" style="{middle_style}">
    <div class="centerStylePadding">
     {middle}
    </div>
   </div>
            <div class="hotStyle2" style="{hot2_style}">
                <div class="hotStyle2Padding">
                    {hot2}
                </div>
            </div>
  </div>
  <div class="rightStyle" style="{right_style}">
   <div class="rightStylePadding">
   {right}
   </div>
  </div>
 </div>
 <div class="footerStyle" style="{footer_style}">
 {footer}
 </div>
</div>

{hidden_blocks}

</body>
</html>
NOTE: Remember to use the same Frame Titles in figure brackets as in the admin template.
- Then we should add the styles from above user template to the active CSS file, for example:
/* Four frames-2 */
.fourFrames2 .headerStyle  {float: left; position: relative; width: 80%;}
.fourFrames2 .smcStyle  {float: right; position: relative; width: 20%;}
.fourFrames2 .hotStyle  {float: left; position: relative; width: 80%;}
.fourFrames2 .leftStyle  {float: left; position: relative; width: 50%;}
.fourFrames2 .centerStyle {float: left; position: relative; width: 50%;}
.fourFrames2 .hotStyle2  {clear: both; float: left; position: relative; width: 100%;}
.fourFrames2 .rightStyle   {float: left; position: relative; width: 20%;}
.fourFrames2 .leftStylePadding  {padding: 0 10px 0 0;}
.fourFrames2 .centerStylePadding {padding: 0 0 0 0;}
Please note, you may need to edit a few existing styles this layout uses to make it look nicer, for example in this case we will need to edit .contentStyle
where we should add clear: both property:
.contentStyle {clear: both; height: 1%; overflow: hidden; position: relative; z-index: 1;}
Now that we have laid the foundation we can add a new layout in admin:
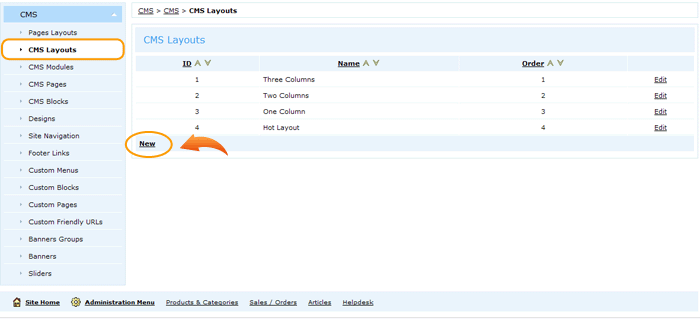
- Go to CMS > CMS Layouts and click on the New link.
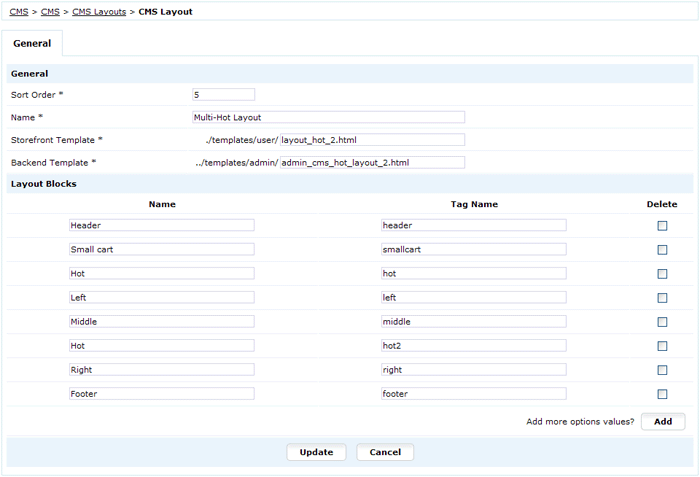
- Specify Sort Order, Name and templates path. In the 'Layout Blocks' section under the column Name specify the frame titles you would like to see in admin.
Important! In the column Tag Name specify exactly the values from figure brackets {} in this layout's templates, if you are wrong even in one character like an additional space or a capital letter the blocks wouldn't be parsed into the frames.
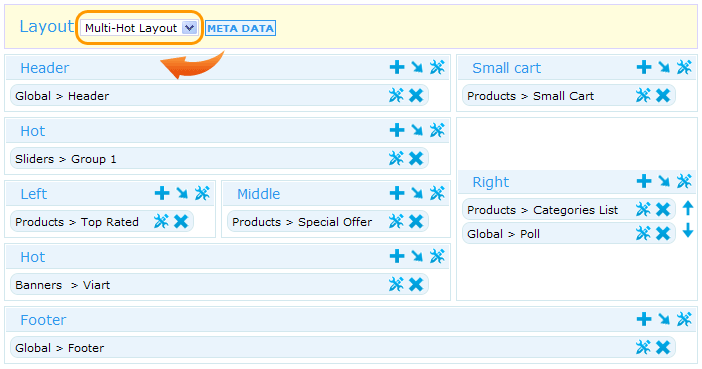
If everything is done correctly you will be able to select the Multi-Hot Layout from Layout Type selection and add blocks into new frames.
And on the site it will look like this:
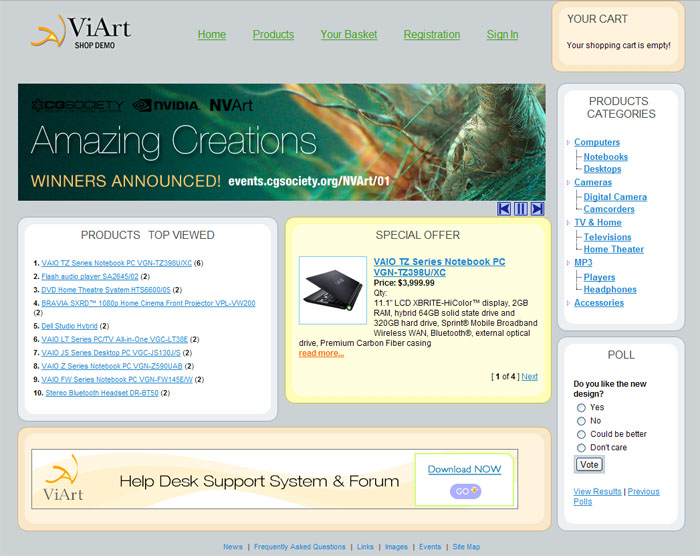
Note: every design is individual so most likely you will need to edit other styles to achieve the perfect look of your site. |