Our site www.viart.com site is operated by latest Viart Shop 5 with default Clear design
ViArt Shop Manual

To remove the 'evaluation version' message on your ViArt, you will need to purchase a unique license and generate a license.php. Please read this section to get the instructions on the process of activation.

The first thing that you are supposed to do after you have installed ViArt Shop is setting up its main parameters.
The first thing that you need to do after you have installed ViArt Shop is to set up the main parameters.
After you have installed ViArt Shop and set up its main parameters you have to specify its administration settings.
It is natural to desire an online store which is both unique and unforgettable, with ViArt Shop you can do this 'on fly'.
ViArt Shop is supplied with nine layouts as default, 'Default', 'Curved', 'Silver', 'Convex', 'Fashion', 'Rainbow', 'Classic', 'Marine', 'Ecommerce'. You can choose either of these layouts according to the needs of your shop, or if you require, you can build your own one!
Bellow are the samples of screenshots for the 'Classic' Layout. This layout has four available schemes to choose from: blue, green, light blue, red. Select any scheme you prefer.
Bellow are the samples of screenshots for the 'Curved' Layout. This layout has three available schemes to choose from: black, blue, pink. Select any scheme you find the most suitable.
Bellow are the samples of screenshots for the 'Silver' Layout. This layout has two available schemes to choose from: dark and light. You can select the scheme that best suits your needs.
The overall view of each layout is set by its global settings. Read the following section to find out how to change the look and feel of an existing layout, also how to create a new one.
The navigation panel is displayed on all pages of your online store, with ViArt Shop you can change the way it is displayed for each layout. It is also possible to distinguish which navigation options are shown to all your visitors and/or only to those who logged in.
This section details how the home page layout is produced. Read the following to understand how to customize the home page layout to suit your needs.
When running an online store, it is very important to stay up to date with what happening behind the scenes. With ViArt Shop it is possible remain aware of occurrances on your site, even if you are away from your computer!. This is possible thanks toViArts SMS functionality, this function allows you to setup your shopping cart system to send you SMS's whenever certain event/s occur.
This chapter will show you how to add products and catagories into your online store.
Sometimes it might be very handy to have a possibility to inform a friend of yours about what you've found. With ViArt Shop your customers will have it. This can also be a good and free promotion of your site.
Even though you run an online store and deal mainly with orders, it would not be out of place to know who your customers are. ViArt Shop allows you to control your customers accounts through the 'Customers' section.
Sometimes you may need to look through some customer personal details. ViArt Shop provides you with such a possibility.
Sometimes you might need to look through or even edit customer login details. Read what you should do in this case.
As you might have already understood customer type is a key notion in the overall customer account management. It defines main customer account settings, discounts a customer will have and customer profile fields.
Actually, the key notion in the overall customer management in ViArt Shop is customer type. It defines main customer account settings, discounts a customer will have and customer profile fields.
Customer profile contains some information about the customer. You can define what kind of it you need by setting up specific fields.
It often happens that customers forget their password. In such a case they can apply to a site administrator providing their logins and some personal information. But it would be much easier to use a special password restoring option.
Should you ever need to find a customer, you can use the search block in the 'Customers' section.
One of the most attractive features of ViArt Shop is its customizability. You can easily make your online store unique and exclusive by adding custom pages.
Custom Block is a perfect solution for customizing your online store and attuning it to your needs. You may create custom blocks for anything you ever need and place wherever on your site.
Viart Shop enables you to create opinion polls for the visitors of your website. Such polls can be very useful for your business. You are allowed to choose between single choice and multiple choices polls.
Another feature of ViArt Shopping Cart is its banner management. Thanks to it you can place any banner you want: links to hot offers of the store or to other sites you own. You can even sell the space to other web-masters.
HelpDesk system is based upon exchanging support tickets. Support Tickets are used for resolving any issue or problem your customers may have. ViArt HelpDesk allows you to track users requests with the help of unique ticket number in a quick and easy way.
Support Ticket System enables your support team to track all the support requests as well as to ensure that no query goes unanswered.
This section provides an information for your customers on how to create a ticket to a tech support team if they face a problem or have a question.
Please read this section to know how to send, assign or edit a support ticket.
ViArt HelpDesk allows to create a request for each client. To do this, you should click Create Message Link and fill the appropriate form.
You or a support specialist may need to find some particular ticket. In this case, you can use a search tool available in the support centre.
The section covers main support center's settings such as Knowledge Base, attachments, random image validation, and email notifications.
This section shows how to assign HelpDesk users - the staff responsible for smooth communication with your customers.
You can estimate your customer by assigning an appropriate status to him. It is necessary if you want to distinguish the most valuable customers.
While preparing an answer to a customer, you can use the Predefined Reply option. Predefined messages can be inserted into your reply by a mouse click. Using predefined messages allows you to save your time and impress your customer with a quick reply.
Once you install your HelpDesk, it is very important to create a department (for example, a support department).
With ViArt helpdesk module you can set the types of a support ticket. Setting the right type of a ticket helps a support team to correctly identify the issue.
One more feature of ViArt HelpDesk is that it provides you with a possibility to support any product you need.
It is usually very important to sort the support tickets by their priorities. ViArt Shop provides you with such a possibility.
ViArt HelpDesk gives you the possibility to create and edit statuses for your replies to customers' support tickets. This option helps you to sort all the tickets at your convenien
You may find it necessary to have some reports on the support tickets. With ViArt Shop helpdesk module you can easily view the status of support tickets, namely, how many tickets were answered, how many tickets are awaiting response, how many tickets were closed, etc
One of the important modules of ViArt Shop is its Forum - an independent portal, intended to provide an online communication between shopping cart users as well as to offer useful information on numerous important issues. If a person has a problem or an idea he/she will have an opportunity to share it with others.
Forum consists of shopping cart related threads or issues which you and your users can exchange and which are later archived for future reference.
Before adding a new topic you should firstly choose the forum to which you want to post your question or issue.
You or someone from your support team may wish to join the discussion and give some piece of advice. In this case, you are to post an answer to a thread.
Categories are 'parents' to forums and are used to hold a group of forums. Your users are unable to post their messages to categories, they can only post their threads to forums. A site which has only a few forum discussion boards may not need any categories. However, if your site has a lot of forum modules, it will be useful for you to create a category.
Sometimes, you may need to create multiple forums for different areas of discussions.
With forum settings you have the possibility to customize your forum according to your requirements. First of all, you should set the global settings.
This chapter is likely to cover the most general settings affecting the whole system and how it works. It allows attuning your ViArt Shop online store just the way you like as well as making main adjustments required for proper operation.
When you are running any kind of business it is no wonder that you need some help. This is true for an online store as well. However, you might not want other people all the information stores in the database. With ViArt Shop you can set up different user groups and assigned different permissions to them.
E-commerce is a place where fraud is very possible. So, you have to protect yourself and your customers as well. With ViArt Shop you can watch IPs your customer use for shopping and block those you think might be trickery.
As time goes by, your online store will grow larger and larger. And it will be quite difficult to watch everything in it, especially what your customers may add or post on it. In such a way you can make your life easier by using banned content functionality.
When working with ViArt Shop you have all the possibilities to make your online store one and only. You can change the feel and look of your site, select different templates and change color schemes. Another great feature is that you have the ability to edit the messages your customers see while surfing your site without the necessity to edit any files.
18. Bonus Points Functionality
Index

Bonus Points functionality is a rather huge customer loyalty feature that can be extremely useful for your site if you are interested in encouraging your clients for their purchases and giving them an opportunity to accumulate points and pay for their purchases with these points. Therefore, the module comprises of two parts, namely: receiving point credits and payment with these point credits.

What one needs to do to receive points? Simply purchase some product and receive points that you previously set per product(s). When a user accumulates enough points, he will be able to purchase items with the accumulated point credits (if an appropriate option is activated) and even pay for the shipping charges.

On the first step of ordering you have the choice: for what items to pay with your points credits and for what items to pay with money. Please note that if your customers want to use or receive points they are to be registered users.

So, you will definitely want to know how to setup the Points functionality. The below guide will give you the necessary tips.

General Settings

The main settings for points functionality are done via Administration > Products > Products Settings > Points Tab. See below a sample:


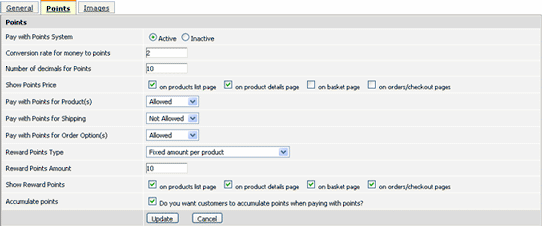
Conversion rate: This is the rate which converts the price of the product to points. In other words, the price of the product multiplies to the number you specify in this field. For example, if you set the conversion rate to 2 and the price of your product is $100, then the point price will be 200. So, if you accumulate 200 points you are able to purchase the product with points.

Number of decimals for Points: This means in what format you would like your points to be displayed and calculated. If you specify '0' in this field, then your points will be displayed like 70. In case you specify '4' - max allowed value in this field, then the points’ amount will be equal to 70.0000.

Reward Points Amount: In this field you specify how many points you want to award your customer for purchasing the product(s). You have a choice to set either general rewards amount which will applied to all products or an individual rewards points amount for a specific product. The general rewards amount is set via Administration > Products Settings > Points Tab, while the points specific amount is attuned on the Edit page of the product.

Setting points for a specific product

You can set points per a specific product only. For this, go to Administration > Products > Products&Categories > Edit Product Page > Points Tab. Please note that if you leave the ‘Points Price’ field blank then the points’ price will be calculated by the points conversion which is set on the Products Settings Page. For example, if the product costs $100 and the conversion rate is set to 10, then one product will cost 1000 points.

Set Points per User Type

In addition, you are allowed to set Reward Points Amount and Reward Type for a certain type of Customers (Administration > Site Users > Profile Settings > Edit Type > Points Section), per each customer (Administration > Site Users > Accounts > View/Edit Info), per each Product Type (Administration > Products > Products Types).

Configure points for Order Status

The deduction or accumulation of the points from the user's balance is made automatically if you activate the option 'Subtract points from user balance' or ‘Return points to user balance’ option in the 'Points Action' field for appropriate statuses. For example, if you have the status 'Confirmed by User' for all your new orders, you activate the mentioned option for this status and the points are deducted from the user's balance when the order with this status is received.

If you go to Administration > Site Users > Accounts, you will notice the new column ‘Points’. By clicking on the ‘Points’ link you will get to the page where you can edit the points balance of your users.

Common Questions

1. I want each Bonus Point to be worth $0.005 on redemption. Or this would be shown that 200 points will earn $1 off the sales total when redeemed?

In this case the conversion rate for money to points will be 200.

2. Can I change this by product - e.g. if I want to allow customers to redeem 200 points for a $2 discount for hair products?

Yes, it's possible to specify exact price in points for certain products. For instance, you can add special offers for some products, like buy this product only for 10 points.

3. Can I choose to issue a higher rate of points on some products? E.G. where a product is more profitable I would offer more points.

Yes, sure. You can set a higher rate of points per each particular product via Administration > Products > Products&Categories, select a certain product and click the 'Points' tab.

4. Can the variation by product be created by product type? This would save the tedium of having to change dozens of products.

Unfortunately, so far there is no possibility to set different points rate per each product type.

5. in : Administration > Order Statuses > Edit Status there is the field: Points Action with options: Subtract points from user balance Return points to user balance Could you please explain this?

This means that for some order status you can select whether to subtract points from a user balance or not. For example, as a rule when the status of the order is changed to a Paid and a user pays with points for some products it can automatically subtract the points from his balance. In case you decide, for some reason, to Refund the order with the product bought for points and set an appropriate status with the 'Return points to user balance' option, it will automatically return the points amount to a user balance.

Index