Our site www.viart.com site is operated by latest Viart Shop 5 with default Clear design
ViArt Shop Manual

To remove the 'evaluation version' message on your ViArt, you will need to purchase a unique license and generate a license.php. Please read this section to get the instructions on the process of activation.

The first thing that you are supposed to do after you have installed ViArt Shop is setting up its main parameters.
The first thing that you need to do after you have installed ViArt Shop is to set up the main parameters.
After you have installed ViArt Shop and set up its main parameters you have to specify its administration settings.
It is natural to desire an online store which is both unique and unforgettable, with ViArt Shop you can do this 'on fly'.
ViArt Shop is supplied with nine layouts as default, 'Default', 'Curved', 'Silver', 'Convex', 'Fashion', 'Rainbow', 'Classic', 'Marine', 'Ecommerce'. You can choose either of these layouts according to the needs of your shop, or if you require, you can build your own one!
Bellow are the samples of screenshots for the 'Classic' Layout. This layout has four available schemes to choose from: blue, green, light blue, red. Select any scheme you prefer.
Bellow are the samples of screenshots for the 'Curved' Layout. This layout has three available schemes to choose from: black, blue, pink. Select any scheme you find the most suitable.
Bellow are the samples of screenshots for the 'Silver' Layout. This layout has two available schemes to choose from: dark and light. You can select the scheme that best suits your needs.
The overall view of each layout is set by its global settings. Read the following section to find out how to change the look and feel of an existing layout, also how to create a new one.
The navigation panel is displayed on all pages of your online store, with ViArt Shop you can change the way it is displayed for each layout. It is also possible to distinguish which navigation options are shown to all your visitors and/or only to those who logged in.
This section details how the home page layout is produced. Read the following to understand how to customize the home page layout to suit your needs.
When running an online store, it is very important to stay up to date with what happening behind the scenes. With ViArt Shop it is possible remain aware of occurrances on your site, even if you are away from your computer!. This is possible thanks toViArts SMS functionality, this function allows you to setup your shopping cart system to send you SMS's whenever certain event/s occur.
This chapter will show you how to add products and catagories into your online store.
Sometimes it might be very handy to have a possibility to inform a friend of yours about what you've found. With ViArt Shop your customers will have it. This can also be a good and free promotion of your site.
Even though you run an online store and deal mainly with orders, it would not be out of place to know who your customers are. ViArt Shop allows you to control your customers accounts through the 'Customers' section.
Sometimes you may need to look through some customer personal details. ViArt Shop provides you with such a possibility.
Sometimes you might need to look through or even edit customer login details. Read what you should do in this case.
As you might have already understood customer type is a key notion in the overall customer account management. It defines main customer account settings, discounts a customer will have and customer profile fields.
Actually, the key notion in the overall customer management in ViArt Shop is customer type. It defines main customer account settings, discounts a customer will have and customer profile fields.
Customer profile contains some information about the customer. You can define what kind of it you need by setting up specific fields.
It often happens that customers forget their password. In such a case they can apply to a site administrator providing their logins and some personal information. But it would be much easier to use a special password restoring option.
Should you ever need to find a customer, you can use the search block in the 'Customers' section.
One of the most attractive features of ViArt Shop is its customizability. You can easily make your online store unique and exclusive by adding custom pages.
Custom Block is a perfect solution for customizing your online store and attuning it to your needs. You may create custom blocks for anything you ever need and place wherever on your site.
Viart Shop enables you to create opinion polls for the visitors of your website. Such polls can be very useful for your business. You are allowed to choose between single choice and multiple choices polls.
Another feature of ViArt Shopping Cart is its banner management. Thanks to it you can place any banner you want: links to hot offers of the store or to other sites you own. You can even sell the space to other web-masters.
HelpDesk system is based upon exchanging support tickets. Support Tickets are used for resolving any issue or problem your customers may have. ViArt HelpDesk allows you to track users requests with the help of unique ticket number in a quick and easy way.
Support Ticket System enables your support team to track all the support requests as well as to ensure that no query goes unanswered.
This section provides an information for your customers on how to create a ticket to a tech support team if they face a problem or have a question.
Please read this section to know how to send, assign or edit a support ticket.
ViArt HelpDesk allows to create a request for each client. To do this, you should click Create Message Link and fill the appropriate form.
You or a support specialist may need to find some particular ticket. In this case, you can use a search tool available in the support centre.
The section covers main support center's settings such as Knowledge Base, attachments, random image validation, and email notifications.
This section shows how to assign HelpDesk users - the staff responsible for smooth communication with your customers.
You can estimate your customer by assigning an appropriate status to him. It is necessary if you want to distinguish the most valuable customers.
While preparing an answer to a customer, you can use the Predefined Reply option. Predefined messages can be inserted into your reply by a mouse click. Using predefined messages allows you to save your time and impress your customer with a quick reply.
Once you install your HelpDesk, it is very important to create a department (for example, a support department).
With ViArt helpdesk module you can set the types of a support ticket. Setting the right type of a ticket helps a support team to correctly identify the issue.
One more feature of ViArt HelpDesk is that it provides you with a possibility to support any product you need.
It is usually very important to sort the support tickets by their priorities. ViArt Shop provides you with such a possibility.
ViArt HelpDesk gives you the possibility to create and edit statuses for your replies to customers' support tickets. This option helps you to sort all the tickets at your convenien
You may find it necessary to have some reports on the support tickets. With ViArt Shop helpdesk module you can easily view the status of support tickets, namely, how many tickets were answered, how many tickets are awaiting response, how many tickets were closed, etc
One of the important modules of ViArt Shop is its Forum - an independent portal, intended to provide an online communication between shopping cart users as well as to offer useful information on numerous important issues. If a person has a problem or an idea he/she will have an opportunity to share it with others.
Forum consists of shopping cart related threads or issues which you and your users can exchange and which are later archived for future reference.
Before adding a new topic you should firstly choose the forum to which you want to post your question or issue.
You or someone from your support team may wish to join the discussion and give some piece of advice. In this case, you are to post an answer to a thread.
Categories are 'parents' to forums and are used to hold a group of forums. Your users are unable to post their messages to categories, they can only post their threads to forums. A site which has only a few forum discussion boards may not need any categories. However, if your site has a lot of forum modules, it will be useful for you to create a category.
Sometimes, you may need to create multiple forums for different areas of discussions.
With forum settings you have the possibility to customize your forum according to your requirements. First of all, you should set the global settings.
This chapter is likely to cover the most general settings affecting the whole system and how it works. It allows attuning your ViArt Shop online store just the way you like as well as making main adjustments required for proper operation.
When you are running any kind of business it is no wonder that you need some help. This is true for an online store as well. However, you might not want other people all the information stores in the database. With ViArt Shop you can set up different user groups and assigned different permissions to them.
E-commerce is a place where fraud is very possible. So, you have to protect yourself and your customers as well. With ViArt Shop you can watch IPs your customer use for shopping and block those you think might be trickery.
As time goes by, your online store will grow larger and larger. And it will be quite difficult to watch everything in it, especially what your customers may add or post on it. In such a way you can make your life easier by using banned content functionality.
When working with ViArt Shop you have all the possibilities to make your online store one and only. You can change the feel and look of your site, select different templates and change color schemes. Another great feature is that you have the ability to edit the messages your customers see while surfing your site without the necessity to edit any files.
15. Affiliates Module
Index

ViArt is constantly updating with new and useful features. An affiliate module available from 2.8 version is one of such features. The module delivers greater flexibility in the shopping cart options. This enhancement allows Internet merchants to offer various discounts, coupons, and referral commissions redeemable at their websites. Additionally, merchants can offer a commission to anyone providing a referral to their site.

To set Global Settings

To set the global settings for affiliates, you should go to Administration > Products > Products Settings and find the 'Merchants and Affiliates Settings' section. There you can set the type of Affiliate commission and its amount. You have an option to choose whether to set the value to some product type or for a particular product.

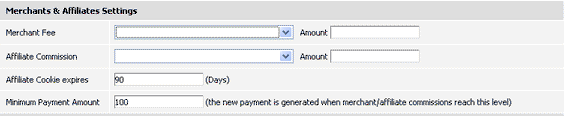
You have the possibility to set the expiration date for affiliate cookies in the Affiliate Cookies Expire field. Cookies are usually set to expire after a predetermined amount of time and are usually saved in memory until the browser software is closed down. In ViArt Shop the default value for cookies expiration is set to 60 days. This means 60 days since a customer visited your site with some affiliate code like 'http://www.viart.com/?af=viart'. Upon expiration of this period an affiliate user does not get any commision for the users he drove to your site.

In case the purchase was made within this period an affiliate user gets his commissions due to the commissions settings. If a user uses the affiliate link again after some period of time then the affiliate period starts from the first day and will have another 60 days to earn the commissions. You are free to set any number of days for affiliate cookies.

Minimum Payment Amount field allows you to set the minimum amount after which a new payment for an affiliate or a merchant user will be generated. The payment won't be generated until a user reaches the level you set in this field.

Create an affiliate group

To create a new affiliate group, please go to Administration > Customers >Profile Settings/Types and click add a new type or edit an existing one link. On the Edit Type page you can overwrite the global affiliate commissions rules to that particular group by editing Affiliate Commission field. Also, the commissions amount can be changed for a particular customer, then for a product group and finally for a particular product.

To enable the affiliate registration, you should go to the Affiliates Settings section and check off the 'Can user join to affiliate program' checkbox.

After you have checked this field, the 'Affiliate Code' field will appear on a user profile page. A user should then enter his affiliate code. This code will be used to pass customers to your site in the following way: 'http://www.yoursite.com/?af=your_affiliate_code'. Note that an 'af' parameter can be added to any query string in your store, for example: 'http://www.yoursite.com/products.php?category_id=1&af=your_affiliate_code'

Please, keep in mind that 'Affiliate Code' field appears only for the new accounts. As for existing accounts, only administrators have the right to change the value in this field.

You may allow a user to check his affiliate statistics, that is what products were sold and what amount of commissions he will get. Then you should check off Can user access to his affiliate sales statistics checkbox.

If you want to allow a user to view real payments made to him and the dates of payments, then you should check off the 'Commission Payments' checkbox in the 'Home Page Settings' section.

Customizing the look of an affiliate module

When you finish with type settings you may find it necessary to edit the look and feel of 'Profile Settings' and fields necessary for affiliate registration.

Sometimes, the simplest way of making payments to your customers is to use PayPal accounts. If you want to make all payments via PayPal, you should go to the Additional Fields section in Profile Settings and check the PayPal Account checkbox. You may also need a tax number from your affiliate users. If so, please check off the Tax Number checkbox as well.

Commission action

Next step is to check if the right Commission Action is set for every status. To do this, please go to Administration > Sales Order Statuses and find the Commission Action field.

Add Commissions should be checked off for 'Paid' or similar status.

For statuses like 'Cancelled', 'Declined', 'Refunded' you are to set the value Subtract commissions.

No commissions value is to be set for other statuses.

Please keep in mind that only after the order status is changed to 'Paid' or similar status, the earning commissions will be added to a user account and will later be included into a user payment. If the order was 'cancelled' or 'refunded' and a user has already received his commisions for this payment, then this amount will be substracted from his payment in the next payment.

Commission Payments Statistics

In order to check generated payments you should go to Administration > Customers > Commission Payments. All automatically generated payments has 'Not Paid' status by default.

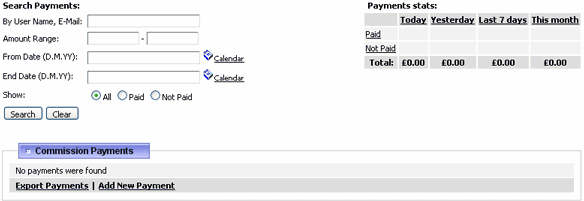
You can make a search query by name or e-mail, by amount, by dates. You may also use a calendar to select the start and end dates. Also, you can search in All, Paid and Not Paid payments.

Note: When you send money to a user you have to update a payment status to 'Paid' as well as to update 'Transaction ID' field if it is available.

If you need to create a payment for a user who didn't reach the 'Minimum Payment Amount' you should go to Administration > Customers Commissions and search for the commissions with 'New' status and click the 'Create Payment' link. Then check the payment details on the 'Edit Payment' page and click the Add New button to create a new payment.

Index