Our site www.viart.com site is operated by latest Viart Shop 5 with default Clear design
ViArt Shop Manual

To remove the 'evaluation version' message on your ViArt, you will need to purchase a unique license and generate a license.php. Please read this section to get the instructions on the process of activation.

The first thing that you are supposed to do after you have installed ViArt Shop is setting up its main parameters.
The first thing that you need to do after you have installed ViArt Shop is to set up the main parameters.
After you have installed ViArt Shop and set up its main parameters you have to specify its administration settings.
It is natural to desire an online store which is both unique and unforgettable, with ViArt Shop you can do this 'on fly'.
ViArt Shop is supplied with nine layouts as default, 'Default', 'Curved', 'Silver', 'Convex', 'Fashion', 'Rainbow', 'Classic', 'Marine', 'Ecommerce'. You can choose either of these layouts according to the needs of your shop, or if you require, you can build your own one!
Bellow are the samples of screenshots for the 'Classic' Layout. This layout has four available schemes to choose from: blue, green, light blue, red. Select any scheme you prefer.
Bellow are the samples of screenshots for the 'Curved' Layout. This layout has three available schemes to choose from: black, blue, pink. Select any scheme you find the most suitable.
Bellow are the samples of screenshots for the 'Silver' Layout. This layout has two available schemes to choose from: dark and light. You can select the scheme that best suits your needs.
The overall view of each layout is set by its global settings. Read the following section to find out how to change the look and feel of an existing layout, also how to create a new one.
The navigation panel is displayed on all pages of your online store, with ViArt Shop you can change the way it is displayed for each layout. It is also possible to distinguish which navigation options are shown to all your visitors and/or only to those who logged in.
This section details how the home page layout is produced. Read the following to understand how to customize the home page layout to suit your needs.
When running an online store, it is very important to stay up to date with what happening behind the scenes. With ViArt Shop it is possible remain aware of occurrances on your site, even if you are away from your computer!. This is possible thanks toViArts SMS functionality, this function allows you to setup your shopping cart system to send you SMS's whenever certain event/s occur.
This chapter will show you how to add products and catagories into your online store.
Sometimes it might be very handy to have a possibility to inform a friend of yours about what you've found. With ViArt Shop your customers will have it. This can also be a good and free promotion of your site.
Even though you run an online store and deal mainly with orders, it would not be out of place to know who your customers are. ViArt Shop allows you to control your customers accounts through the 'Customers' section.
Sometimes you may need to look through some customer personal details. ViArt Shop provides you with such a possibility.
Sometimes you might need to look through or even edit customer login details. Read what you should do in this case.
As you might have already understood customer type is a key notion in the overall customer account management. It defines main customer account settings, discounts a customer will have and customer profile fields.
Actually, the key notion in the overall customer management in ViArt Shop is customer type. It defines main customer account settings, discounts a customer will have and customer profile fields.
Customer profile contains some information about the customer. You can define what kind of it you need by setting up specific fields.
It often happens that customers forget their password. In such a case they can apply to a site administrator providing their logins and some personal information. But it would be much easier to use a special password restoring option.
Should you ever need to find a customer, you can use the search block in the 'Customers' section.
One of the most attractive features of ViArt Shop is its customizability. You can easily make your online store unique and exclusive by adding custom pages.
Custom Block is a perfect solution for customizing your online store and attuning it to your needs. You may create custom blocks for anything you ever need and place wherever on your site.
Viart Shop enables you to create opinion polls for the visitors of your website. Such polls can be very useful for your business. You are allowed to choose between single choice and multiple choices polls.
Another feature of ViArt Shopping Cart is its banner management. Thanks to it you can place any banner you want: links to hot offers of the store or to other sites you own. You can even sell the space to other web-masters.
HelpDesk system is based upon exchanging support tickets. Support Tickets are used for resolving any issue or problem your customers may have. ViArt HelpDesk allows you to track users requests with the help of unique ticket number in a quick and easy way.
Support Ticket System enables your support team to track all the support requests as well as to ensure that no query goes unanswered.
This section provides an information for your customers on how to create a ticket to a tech support team if they face a problem or have a question.
Please read this section to know how to send, assign or edit a support ticket.
ViArt HelpDesk allows to create a request for each client. To do this, you should click Create Message Link and fill the appropriate form.
You or a support specialist may need to find some particular ticket. In this case, you can use a search tool available in the support centre.
The section covers main support center's settings such as Knowledge Base, attachments, random image validation, and email notifications.
This section shows how to assign HelpDesk users - the staff responsible for smooth communication with your customers.
You can estimate your customer by assigning an appropriate status to him. It is necessary if you want to distinguish the most valuable customers.
While preparing an answer to a customer, you can use the Predefined Reply option. Predefined messages can be inserted into your reply by a mouse click. Using predefined messages allows you to save your time and impress your customer with a quick reply.
Once you install your HelpDesk, it is very important to create a department (for example, a support department).
With ViArt helpdesk module you can set the types of a support ticket. Setting the right type of a ticket helps a support team to correctly identify the issue.
One more feature of ViArt HelpDesk is that it provides you with a possibility to support any product you need.
It is usually very important to sort the support tickets by their priorities. ViArt Shop provides you with such a possibility.
ViArt HelpDesk gives you the possibility to create and edit statuses for your replies to customers' support tickets. This option helps you to sort all the tickets at your convenien
You may find it necessary to have some reports on the support tickets. With ViArt Shop helpdesk module you can easily view the status of support tickets, namely, how many tickets were answered, how many tickets are awaiting response, how many tickets were closed, etc
One of the important modules of ViArt Shop is its Forum - an independent portal, intended to provide an online communication between shopping cart users as well as to offer useful information on numerous important issues. If a person has a problem or an idea he/she will have an opportunity to share it with others.
Forum consists of shopping cart related threads or issues which you and your users can exchange and which are later archived for future reference.
Before adding a new topic you should firstly choose the forum to which you want to post your question or issue.
You or someone from your support team may wish to join the discussion and give some piece of advice. In this case, you are to post an answer to a thread.
Categories are 'parents' to forums and are used to hold a group of forums. Your users are unable to post their messages to categories, they can only post their threads to forums. A site which has only a few forum discussion boards may not need any categories. However, if your site has a lot of forum modules, it will be useful for you to create a category.
Sometimes, you may need to create multiple forums for different areas of discussions.
With forum settings you have the possibility to customize your forum according to your requirements. First of all, you should set the global settings.
This chapter is likely to cover the most general settings affecting the whole system and how it works. It allows attuning your ViArt Shop online store just the way you like as well as making main adjustments required for proper operation.
When you are running any kind of business it is no wonder that you need some help. This is true for an online store as well. However, you might not want other people all the information stores in the database. With ViArt Shop you can set up different user groups and assigned different permissions to them.
E-commerce is a place where fraud is very possible. So, you have to protect yourself and your customers as well. With ViArt Shop you can watch IPs your customer use for shopping and block those you think might be trickery.
As time goes by, your online store will grow larger and larger. And it will be quite difficult to watch everything in it, especially what your customers may add or post on it. In such a way you can make your life easier by using banned content functionality.
When working with ViArt Shop you have all the possibilities to make your online store one and only. You can change the feel and look of your site, select different templates and change color schemes. Another great feature is that you have the ability to edit the messages your customers see while surfing your site without the necessity to edit any files.
9.4. Banners
9.4. Banners
Prev Index Next

Another feature of ViArt Shopping Cart is its banner management. Thanks to it you can place any banner you want: links to hot offers of the store or to other sites you own. You can even sell the space to other web-masters.

Our banner management system gives you the possibility to track the number of impressions and clicks, decide whether to show it on SSL or not and to choose whether to open a banner in a new window or not.

Adding Banners Group

Before creating a banner you should firstly add several banners groups. Banners groups are necessary to group your banners. To do this go to Administration>ViArt CMS>Banners and click on Banners Group button. Click on Add New Group button.


Banner Group

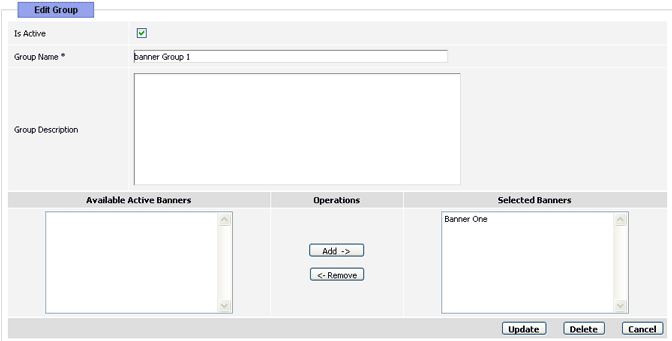
If you want to make your group active tick off Is Active checkbox.
In the Group Name Field enter the name of the group. This field is obligatory.
The Description field allows you to enter some description of the group if such description is needed.
After doing this click Add button and save your banners group. Follow the same procedure to create as many groups as you want.

Adding A Banner

After creating banners groups, you can start adding banners. To add a new banner, click on Add New Banner button.


Banners

If you want your banner to be active, tick off Is Active checkbox. You may wish to leave your banner inactive (not to be shown on your site) until you get familiar with it. In this case leave Is Active checkbox unchecked.
Rank field is obligatory for filling. This field requires entering the position you want your banner to appear on the site.
In Title field you should enter the name of your banner. You may choose whether to show the title on the site or not. If you want your title to be displayed tick off Show Title checkbox. Otherwise, leave the box unchecked.
Further, you may wish to upload the image of your banner. To do this, click on Upload Image button in the Image Field. Choose an appropriate image in the open window and click on Upload button. After uploading close the window. If you already have some uploaded images, click on Select Image button and choose the banner you want to upload. After uploading the selected image close the window.
The next field is Image Alt. This field allows you to enter the text which will either be displayed instead of an image or when pointing at the image.

Banners

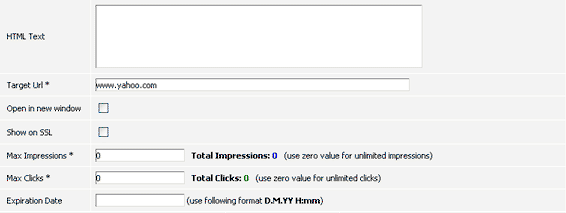
In Html Text field you can enter the text of your banner. Please don’t forget that you should enter the text in html code otherwise it is not shown on the website.
Target URL is obligatory for filling. Here you should enter the URL of the target page or site to which you want to lead the potential customer.
You might want your banner to be opened in a new window. In this case tick off Open in new window checkbox. If you do not want to do it just leave it without changes.
To show your banner on SSL, tick off Show on SSL checkbox. Your banner will be also shown on SSL websites.
Maximum Clicks and Maximum Impressions fields allow you to enter the maximum value of clicks/impressions for each of your banner. When this value is reached, your banner becomes inactive. If you do not want to set the limits for clicks/impressions then you should set the value to zero.
In Expiration Date field you may enter the date when your banner should be expired. Please, use D.M.YY H:mm format.

Banners

At the end you should choose the group(s) you want your banner to be placed. Select an appropriate group(s) and click Add button. You can also remove either of the group(s) by clicking Remove button.
Finally, click Add button to save the banner with your settings. If you do not want to save the banner, click on Cancel button. Follow the same procedure to create as many banners as you want.

Editing an existing banner
To edit an existing banner and change its link, its picture, etc, select the banner you want to change, and click Edit button. Make the necessary changes and click Update button.

Adding Banners Group Block
After creating banners groups and banners you are to add banners group block to your site. To do this go to Administration > ViArt CMS > Site Layout > Home Page Layout, choose the appropriate banners group from the list of available blocks and move the block to one of the columns. Click on Update button and the banners group will appear on the site.
Prev Index Next