|
This tutorial covers the following sections:
Steps to upgrade ViArt Shop
To make a standard upgrade of ViArt shop to a new version please ensure you do the following steps:
1. Create a dump of your database.
This can be done either using a a backup tool ‘DB Management’ available in the Admin panel (in all versions starting from 3.2) - this is recommended. Or with the help of phpmyadmin program.
If using a DB Management tool, please do the following:
- Navigate to Tools > Tools > DB Management. The screen will look like as follows:
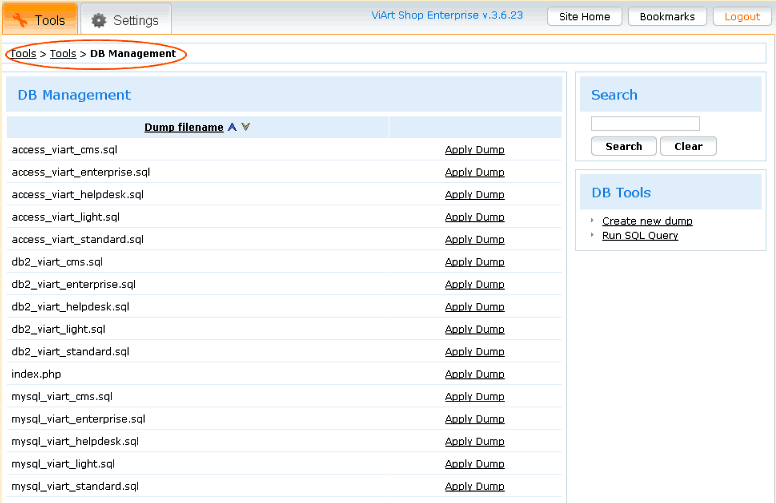
- To create a backup of your DB click on the ‘Create new dump’ link in the right column of the screen:

- Once the link is clicked you’ll get to the next screen:
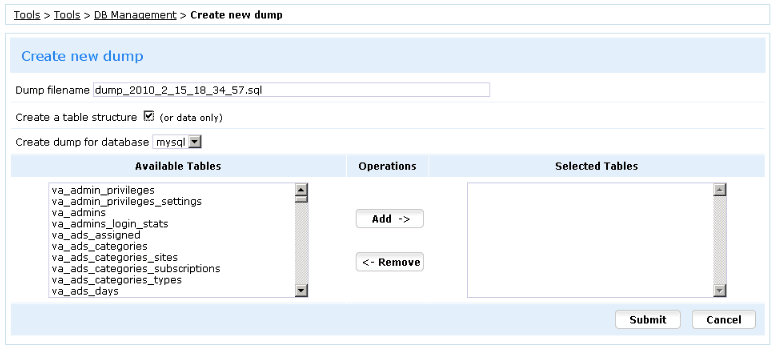
- Enable an option ‘Create a table structure (or data only)’ – this will create a new table structure for the DB dump and will place all the tables there.
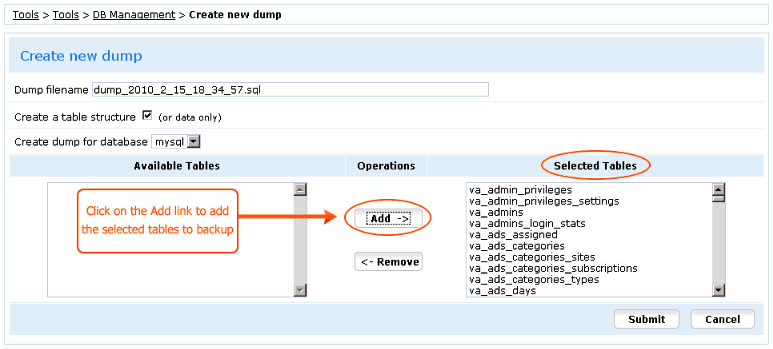
- Use a SHIFT+left-click on the mouse to add all tables to a backup or some selected tables (if you do not want to dump all the tables). Once the tables are selected click on the ‘Add’ link to add the tables for backup (as shown on the image):
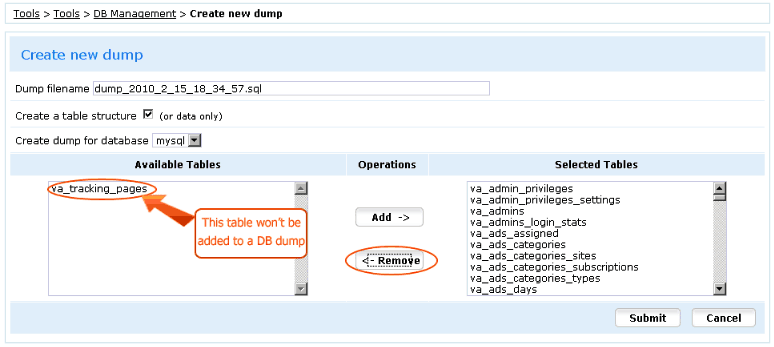
- If you decide to remove either of the tables from the selected tables click on the ‘Remove’ button and the table will return to the left column and won’t be added to a backup:
- Click on the ‘Submit’ button to create a dump. If everything is done properly, you’ll get the following result:

- To view your DB dump file please open the folder ‘db” and find a file with the extension .sql (like, dump_2010_2_12_18_29_12.sql). This is the dump file of your DB.
Create a dump of the DB via phpmyadmin
Another option to create a dump of the DB is to use a phpmyadmin program which is used rather often when working with the tables of the shop. If you prefer to use a phpmyadmin please do the following:
- Open your phpmyadmin program and select a Database with your shop tables.
- Navigate to an Export tab where you'll such a screen (or similar - depending on your version of phpmyadmin):
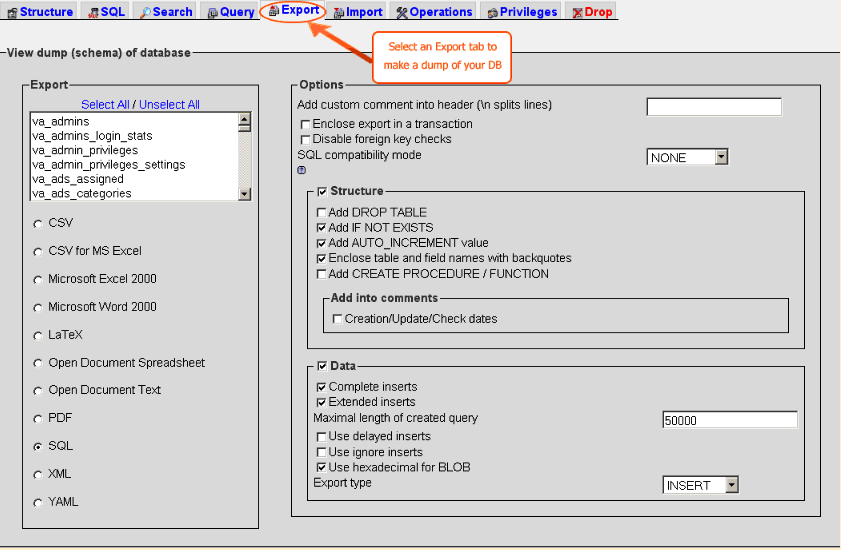
- Use a SHIFT+left-click on the mouse to select the tables you want to add to a backup, select sql format and compression type as 'Zip into an archive':
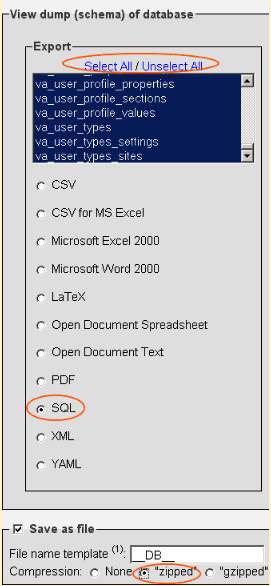
- Once this is done, click on the 'Go' button to create a dump of your DB and save it to the location you want (i.e. on your computer).
- Unzip an archive to check your dump file. The file will be with the extension .sql (like, dump_2010_2_12_18_29_12.sql). This is the dump file of your DB.
- Once the backup is created you can move to a next step – backing up scripts and templates.
2. Backup all files in your current version.
This can be done via any FTP client program. To do a backup please do the following:
- Create a new folder either on your computer or on your server where you will copy the files of your current version.
- Open an FTP client you use (in our example it will be a WinSCP client program) and navigate to the folder with your shop (usually, it is ‘public_html’ folder).
- Select all files and FTP them to the folder on your computer (or server):
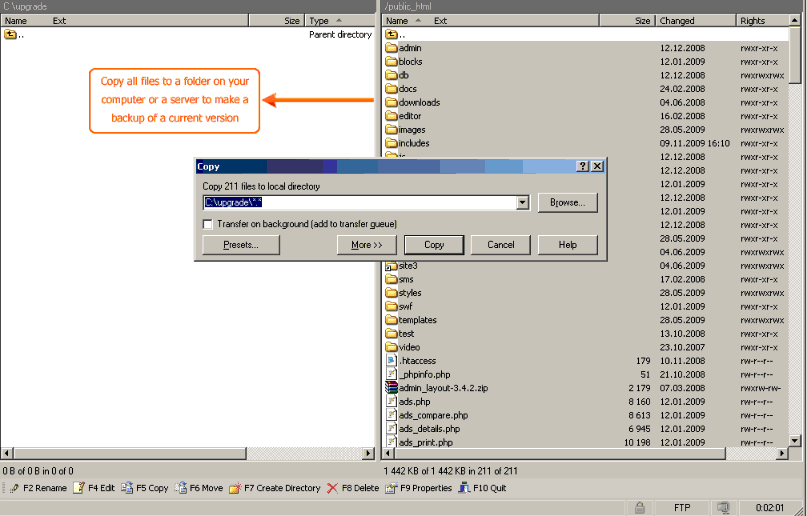
3. Download a new version
A new version can be downloaded either from http://www.viart.com/php_shopping_cart_free_evaluation_download.html or from your user's area.
4. Working with new files
Once the version is downloaded, please do the following:
- Unzip an archive with the new version and extract all default folders and files overwriting the existing ones (except the ones you've modified, e.g. templates, styles, images).
- The modified images, templates and files should be then copied over the old ones.
Tip: From version 3.4 a new structure for customized templates has been added to make the upgrade easier. We recommend you to do the following:
- Create a separate folder for the templates you have made changes to and put the modified templates there.
- Select this folder as the Templates Directory * for the active layout you are using (CMS > Designs > Edit).
- When doing the upgrade the system will consider this directory as a default and will take your custom templates as active. If it doesn't find an appropriate template it will refer to the default folder with standard templates and your site will work smoothly and without any errors.
5. Change the read/write/execute permissions to 777 for the /includes folder.
This can be done via any FTP client program.
6. Copy the 'var_definition.php' file from your backup 'includes' folder and paste it in the 'includes' folder of your new version.
7. Upgrade your DB
To upgrade the DB please navigate to your Administration interface ('Tools > Tools > System Upgrade') and click on the 'Upgrade Database' button to run a sql update.

If the database is updated properly you will receive the following result:

This means that the upgrade to the latest version is successful.
Extra step if you upgrade from v.4.1 or below
Since version 4.2 ViArt Shop moved to UTF-8 charset. This means database content needs to be switched from any other encoding to this format. For this reason there was created a special script to perform database conversion.
Note: if your site already runs on UTF-8 skip this step.
What do you need to do to switch to UTF-8?
Enter in the browser bar this URL: yoursite.com/db_utf8.php
You should see such page:
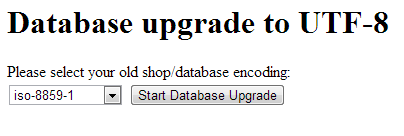
Select the current charset of your database and click Start Database Upgrade
Tips for performing a custom upgrade
If your shop has any programming or design modifications we'd recommend you to pay attention to the following tips:
- Keep a list of the files that have been modified during your customizations.
- Make a copy of your site in some test folder and perform an upgrade there to ensure that everything works properly.
- Once new files are uploaded look at the files side by side (in other words, compare files that were modified with the old ones).
- Copy over your customized code to the new upgraded files leaving the rest of the new code in place. Save the changes.
- Before editing a file, copy it with the original filename and append "OLD" before the filetype so you can instantly see what's been changed.
- If you are adding or changing message or language files leave the original and add changes to the end.
- Once done comparing all of the pages you're finished with the upgrade of your test site. Now you can migrate the files to your live site.
Note: If you're not confident about making a custom upgrade yourself then we suggest contacting our support team for a quote on a custom upgrade service.
Upgrade Live site
If you did upgrade on a test copy of the site there are two ways how you can proceed next.
- 1) upgrade Live site [recommended]
- upload all files including the modified ones from the test copy over the Live site files;
- change the var_definition.php file to link to the Live database;
- click 'System Upgrade' in admin panel;
- apply dump of CMS tables from test copy to the Live site (to save layout changes if you did any).
- 2) or use test copy as a Live site
- make export of orders, users and products* information from Live site.
*Note: export/import of products doesn't preserve all product information such as options, subcomponents etc.
- delete your Live site (making a backup beforehand) and upload the test copy in its place;
- import orders, users and products information.
Information on updating the license
Please note that your license is valid for free upgrades from 6 to 12 months (depending on your license type). Therefore, if you receive a note ‘Your license has expired on..’ in the footer of your shop after the upgrade please purchase an updates extension at http://www.viart.com/updates_extension.html
Once we receive the payment we’ll update your license and you’ll be able to regenerate a license file at http://www.viart.com/activation. For more information on the activation see section 2.3 |


