|
|
|
This tutorial covers the following sections:
OverviewAffiliate module available in ViArt shopping cart from version 2.8 enables users of ViArt shopping cart to potentially generate more sales by having affiliates that lead prospective customers to their product for a certain referral % of each sale. When a visitor is referred to a certain site and a sale is generated from this referral, the affiliate module recognises the sale as an affiliate-driven purchase and calculates the commissions. Back to topGeneral affiliate settingsTo start with the affiliate module please navigate to Administration > Products > Products Settings > Merchants & Affiliates Settings tab where you will be presented with such a screen:  where Affiliate Commision option defines the amount of commisions to be paid to referrals. This can be a fixed amount or a percentage rate. Affiliate Commissions Deduction - if this option is enabled affiliate commisions will be subtracted from a merchants fee (if it is enabled). Affiliate Cookie expires option enables a store owner to set a preferrable cookie length period within which a user may return to a site and complete a purchase without using an affiliate link again. In ViArt Shop the default value for cookies expiration is set to 60 days. This means 60 days since a customer visited your site with some affiliate code like 'http://www.viart.com/?af=viart'. Upon expiration of this period a referral does not get any credits. However when a visitor comes via an affiliate link once again, the duration of the cookie will be reset. Minimum Payment Amount option sets the minimum commision amount to be reached until commision payments are paid to an affiliate and a new payment is generated. Once you complete with the general settings, click the 'Update' button to save the changes and move to creating an affiliate group. Back to topAdding an affiliate groupTo manage affiliates through your Admin interface you should create an affiliate group(customer type). To create an affiliate group please navigate to Administration > Site Users > Users Types and click the 'Add New User Type' link - you need a section 'Affiliate settings':  Enable the option 'Can user join to affiliate program' to allow your customers to be affiliates. If this option is enabled, a field 'Affiliate code*' appears on the user_login.php page: 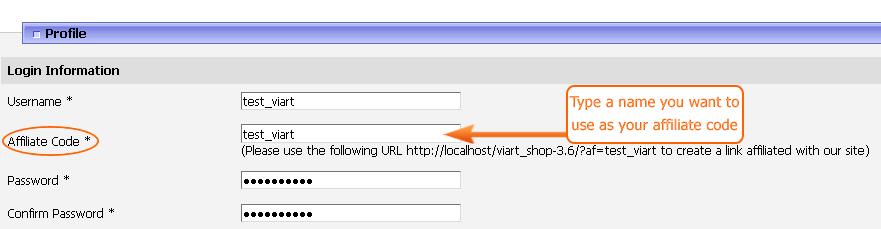 A new affiliate customer enters a preferred affiliate code. This code will be used to pass customers to your site in the following way: 'http://www.yoursite.com/?af=your_affiliate_code'. Note that an 'af' parameter can be added to any query string in your store, for example: 'http://www.yoursite.com/products.php?category_id=1&af=your_affiliate_code'.
Note: The 'Affiliate Code' field appears only for the new accounts. As for existing accounts, only site administrator is able to change the value in this field through the Admin interface. If you want to provide your customers with an access to their affiliate sales statistics, please ensure to enable the option 'Can user access to his affiliate sales statistic'. Once done, please register as an affiliate and check a user home page - The Affiliate Sales section will appear:  Access this section each time you wish to check your affiliate commissions. To allow users to see the details and status of their commission payments please select an option 'the 'Commission Payments' on the Home Page settings for a user type and check the site - User Home Page. A section 'Commission Payments' will appear. Click the 'Commission Payments' link to log on to commission payments statistics:  If you do not want to make a Commission payments section available for affiliates, just leave this option blank. If you want to overwrite default affiliates commissions set on the product settings page to affect only this user type, please switch to Discounts, Fees, Commissions tab and specify the Affiliate Commission type and amount. The easiest way to send commissions to affiliates is to use Paypal system and send commissions to users paypal accounts. Thus, you'll need to know their paypal accounts and sometimes their tax numbers. To enable these options please navigate to Administration > Site Users > Users Types > Profile Settings > Predefined Fields Tab > Additional Details Section. Once done two extra fields will appear on the registration page: 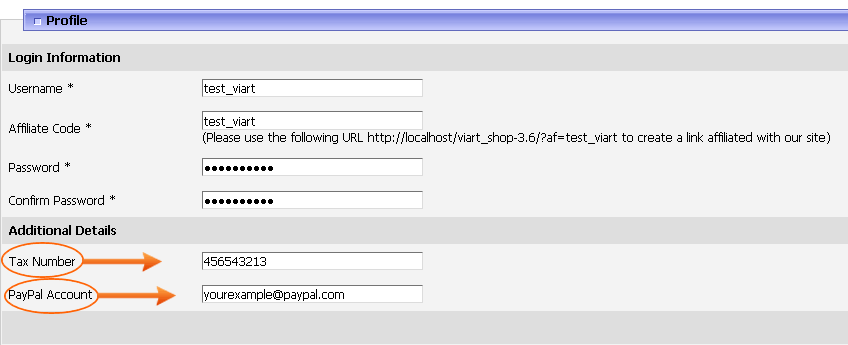 Back to top Affiliate commissions for order statusesNext step is to check if the proper Commission Action is set for your active statuses. To do this, please navigate to Administration > Orders > Orders Statuses and find the Commission and Reward Actions option. Select 'Add commissions, reward points and credits' to add commissions to an affiliate account if an order gets this status. Usually, this option is set for Paid or other successful statuses. Select 'Subtract commissions, reward points and credits' to avoid adding commissions to an affiliate account if an order gets this status. This option is usually set for statuses like 'Cancelled', 'Declined', 'Refunded', etc. For more information on order statuses see section 27.2 Note: The earned commissions will be added to a user account and will later be included into a user payment once the order status is changed to a 'Paid' or a similar status. If the order was 'cancelled' or 'refunded' and a user has already received his commisions for this payment, then this amount will be subtracted from his payment in the next commission payment. Back to topUsers commissions and commission paymentsOnce the commissions reach the minimum amount (set in the Product Settings page) a new payment is generated at Administration > Site Users > Users Commissions:  If you're ready to pay the commissions please send money to a customer using your Paypal account (or other method you prefer) and then press the 'Create Payment' link. Once this is done, set a status to Paid and specify a transaction number: 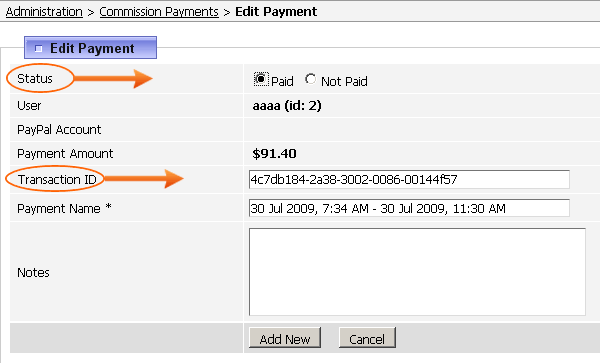 Add comments (if any) in the Notes textarea and press the 'Add New' button to update the payment. You will be redirected to Commission Payments page where you can see that the status of the payment is changed to Yes: 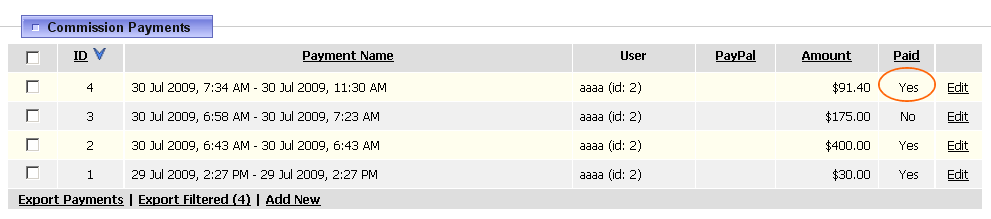 You can also search for a certain payment using a search engine available at Administration > Site Users > Commission Payments: 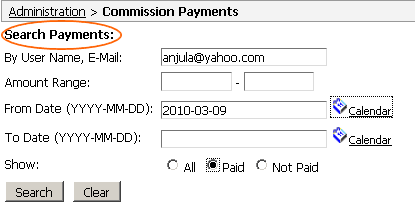 Commission payments can be searched by user's name, email, amount range. A javascript calendar feature is also available which helps you to search payments by a specific date or a period. To filter commission payments by paid or not-paid statuses use the Payment Stats grid available in the upper right corner of the commission payments page: 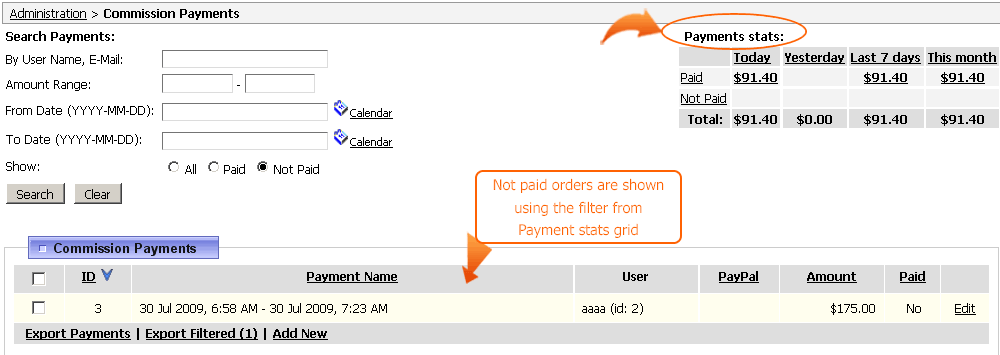 |
|
|

