Overview
From version 3.4 Viart Shop has been updated with a new feature - possibility to create Filters. This feature helps users to sort products by
different parameters, for example by price ranges, accessories, options, manufacturers, different specifications and so on.
Default Filter
At present there is available a default filter in ViArt Shop which you can use to sort products by Manufacturer, Price, Product Type and Rating.

To activate (or remove) this filter go to CMS > Products Listing Page and add (or remove) the Filter (Default Filter)
block to one of the columns and then click Update or Apply.
In case you would like to edit or remove one of the filter options (for
example, change price ranges or remove rating filter) go to CMS > Filters >
Default Filter > Filter Options and click on Edit
next to the filter option. Then if you want to remove the option click Delete button or change the values and
then click Update to save them.
Creating an Option Filter
To create a new filter go to CMS > Filters and click on the Add New link (as shown below).

- 1) Select the type 'Products' (only products filter is available at the moment), specify the name of the filter, for example 'Test' and give some
description (if applicable). Please, see below a sample:
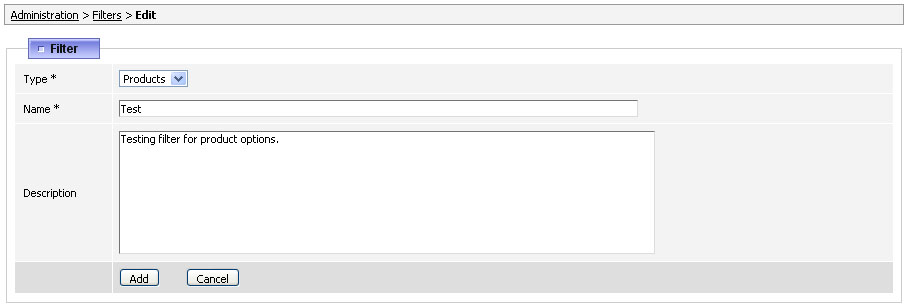
- 2) Save the changes by clicking Add. This is how to create a Filter group. You see that Filter
Options appeared.
- 3) Click on Filters Options and then Add new to create Filters. Let's create a sample filter for product options.
where
- Option Order is an order number for this filter.
- Option Name is a name for this filter, like Option filter,
for example.
- Type is the type of available filter option, for our example we need to select 'Product Option'.
- In Product Option Name field enter exactly the name of the option from your product's 'Options & Components' attribute
(see section 18.6.3), for example, we have listbox option
called 'test option' with values 'test1' and 'test2'.
- Order defines the order in which you want to place option values.
- Value ID is the message from the 'Value' field in the
product's Options Values, in our case they should be 'test1' and 'test2'. NOTE: the values in filter and option must match or filter
wouldn't work.
- Title is the title for this filter option, it can be any name, for example
'Sort products by XX' and 'Sort products by YY'.
Please, refer to the image below for an example described above.

- 4) Press the 'Add new' link to save this Filter.
- 5) When done, go to CMS > Products Listing Page and add the Filter (Test) block to any of the columns.
- 6) Then check the site. If everything is set correctly, then your filter will look like this:

Click the link 'Sort products by XX' for example, to view the products with option value 'test1'. To return to products list click 'remove filter' link.
Creating a Specification Filter
- 1) Go to CMS > Filters > Add New and name the filter group e.g. Specification.
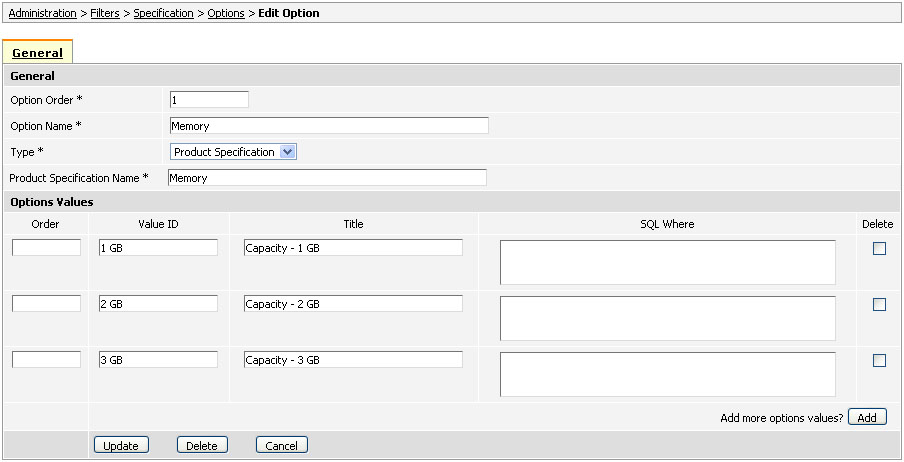
- 2) Click on Filter Options for the created filter and then Add new to create filter options. Specify the fields this way:
- Option Order is an order number for this filter.
- Option Name can be any but usually users put here the name of the specification group (see section 18.6.5).
- Type select 'Product Specification'.
- Product Specification Name is important to have exactly the same as
the value in the Name field under Specification Group (see screenshot below).

- Order defines the order in which you want to place option values.
- Value ID needs to be exactly the same as the values you put in the Specification Group. For example, the
Specification Group is 'Memory'
so the values in it for different products are '1 GB', '2 GB', '3 GB' etc.
- Title is the name of this filter category, it could remain the same as Value ID (e.g. 1 GB, 2 GB, 3 GB) or you could name them, for example
'Capacity - 1 GB', 'Capacity - 2 GB', 'Capacity - 3 GB' etc.
Please, refer to the image below for an example described above.
- 4) Press the 'Add new' link to save this Filter.
- 5) When done, go to CMS > Products Listing Page and add the Filter (Specification) block to any of the columns.
- 6) Check the site. If everything is set correctly, then your filter will look like the below:

Click the link 'Capacity - 1GB' for example, to view the products with
specification value '1 GB'. To return to products list click 'remove filter' link.
|

