|
|
|
This tutorial covers the following sections: Back to topOverviewWhen a customer places an order, he needs to pay for it, and you will require a method to collect this money. You can do this with the help of a payment processor. Version 3.7 of ViArt Shop supports more than 80 different processors to select from. To see a full list of currently supported Payment Systems, we'll recommend to install the latest version from our site and navigate to Administration > Sales Orders > Payment Systems. Back to topEdit Payment System page settingsTo setup a payment processor, please ensure you do the following steps (as an example, we'll take a Personal Payment System):
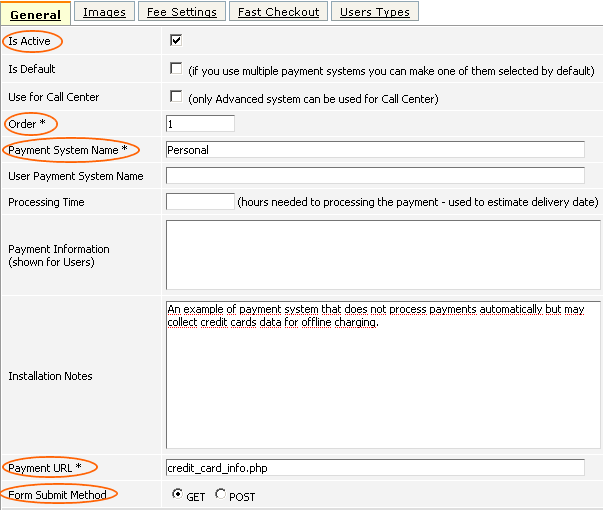 You may also decide to use optional fields available on the Payment Edit page, like: Is Default - to make this payment system a default one. This is used when you have several active payment processors but would like to make one processor as a default one. User Payment System Name is a name for the payment processor that a customer will see on the checkout page. This name may differ from the one you've set in the Admin panel. Payment Information - is a textbox where you can add some information on the gateway which will be shown for your customers on the user_order.php page (in the Payment Details block): 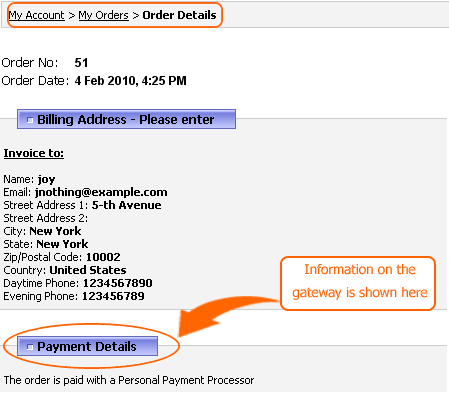 Back to top Payment Details PageOnce personal and delivery details are entered, a customer proceeds to the 'Checkout: Payment details' page. To customize this page please navigate to Administration > Sales orders > Payment Systems > Payment Details Page (choose the corresponding link). The page you are presented with is very similar to that of the 'Sales Order Profile Settings' page (see section 74.1.1). Within this page you can manage the following sections: HTML SettingsAny text which is placed into the 'Intro text' text area will be displayed at the top of the Checkout: Payment details' page. If required, you may also use HTML tags. Payment Data Fields Many parameters are predefined, however, it is also possible to create your own. Note: For more information regarding custom fields see section 74.1.2. The process of creating a custom field for the 'Checkout: Personal information' page is very similar as that for the 'Checkout: Payment details' page. Differences are as follows:
The predefined fields are: 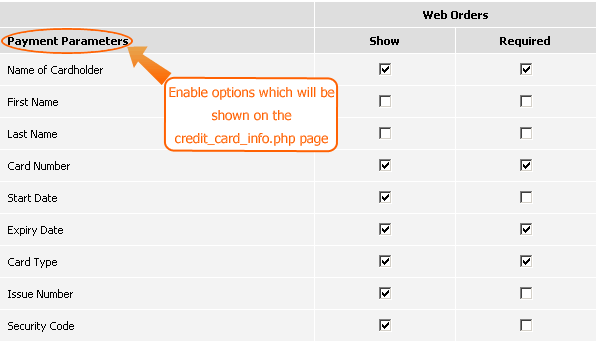 Selecting the tick box in the 'Show' column displays the field to customers, a tick in the 'Required' column makes the field required. Note: Some fields (for example, 'Start date', 'Expiration Date', 'Card type' etc.) will be shown to customers in the form of a list box. To customize/arrange this list please navigate to the 'Static tables' section (for more info see section 81.3). Secure Options The following settings specify the security level for the administration side of your online store. 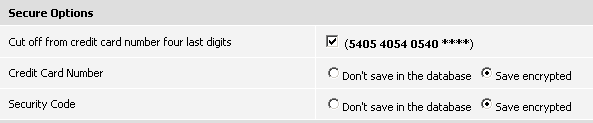
Note: There are two more security-related issues: security issues (see section 72.5) and secure pages (see section 73.1)
Final Checkout Settings
Once the order has been confirmed by a customer, they are forwarded to the last step of the checkout: 'Checkout: Final'. At this stage he is informed of the status of the order which has been placed. To configure this page please go to Administration > Sales orders > Payment Systems > Final Checkout Page. Final Messages Here enter the text you want your customers to see after the order has been confirmed, this may be thanks or instructions as what to do next. The message should depend on the status assigned to the order therefore you need to set up three of them. Note: As usual, it is possible to use any HTML tags, e-mail tags (click the 'click here to learn more about email settings and see all available message tags' link below) and two special ViArt Shop tags {error_message} or {pending_message} (the messages are generated by the payment system depending on the situation). E-mail Notifications With ViArt Shop you can receive e-mail notifications when several different events occur on your store, moreover, you can set up e-mail notifications for your customers as well. In order to do this you need to tick off the corresponding check boxes and the system will send e-mail whenever a new order is completed. Note: you can get a detailed description of all e-mail fields if you click the 'click here to learn more about all email fields' link. ViArt Shop can send email messages in both HTML and Plain text formats. Setting the 'Message Type' radio button to 'HTML' allows you to send emails in HTML format, thus HTML tags will be used for formatting message as HTML. The 'Plain text' option discards any HTML formatting - the message will be sent exactly as it is. Another option of e-mail notifications is the ability to use special ViArt Shop tags. These tags are placed in braces and when an e-mail message is sent, the tags are replaced by tags values. For example, the {first_name} tag will be replaced by the first name of the customer who submitted the order. You can look through the full list of such tags by clicking the 'click here to learn more about email settings and see all available message tags' link. Note that it is possible to add these tags into your email body and email subject. To save the changes click on the 'Update' button. If you want to leave without saving click on the 'Cancel' button. |
|
|

