18.6.4. Subcomponents, subcomponents selection
18.6.4. Subcomponents, subcomponents selection


|
|
Together with product options ViArt Shop offers one more significant feature - the subcomponents functionality.
This functionality permits to add a Subcomponent or a Subcomponent Selection.
It means that you can make up compound products by adding a number of subcomponents to a product and sell them as bundles.
Note, that the basic product will not be added to the shopping cart when you set up "Product Type" as "Bundle".
Add a Subcomponent
To add a Subcomponent go to Products > Products & Categories > Options & Components > Subcomponent.
 The fields available to fill in on Edit Subcomponent page look like this:
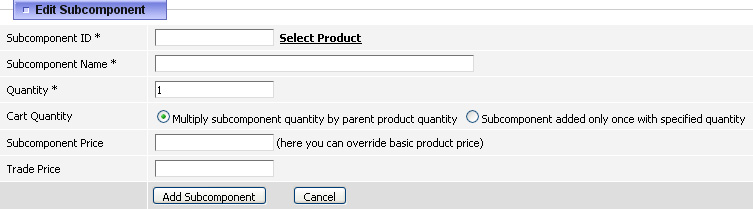
- Subcomponent ID - You can either type in this field the item_id of
the product or use the Select Product link to browse through the products and find the one you need.
In case of using Select link the Subcomponent Name will be auto-filled as well.
- Subcomponent Name - You need to type here the name of the subcomponent product. Note you can type any name here, not necessarily its original name - system
identifies the product by the item_id number not by name.
- Quantity - This is the quantity of this subcomponent that goes with the product. By default the value is set to 1.
- Cart Quantity - Multiply subcomponent quantity by parent product quantity - This means if customer added to cart two basic products then there will be added two subcomponents,
if he added three, then there will be added three subcomponents and so on. In other words the quantity of subcomponents increases with each added product.
- Cart Quantity - Subcomponent added only once with specified quantity - This means there is a fixed amount of subcomponents
that goes with this product and the basic product quantity has no influence on it.
For example, if Quantity is set to '3' then whether customer adds two basic products, three or five the number of subcomponents will always remain '3'.
- Subcomponent Price - This field allows to specify the price for this
product as subcomponent. If it's left blank then system will take its original
price which you can see in the brackets.
- Trade Price - This price is shown to those users who have Trade Price activated in their User Type.
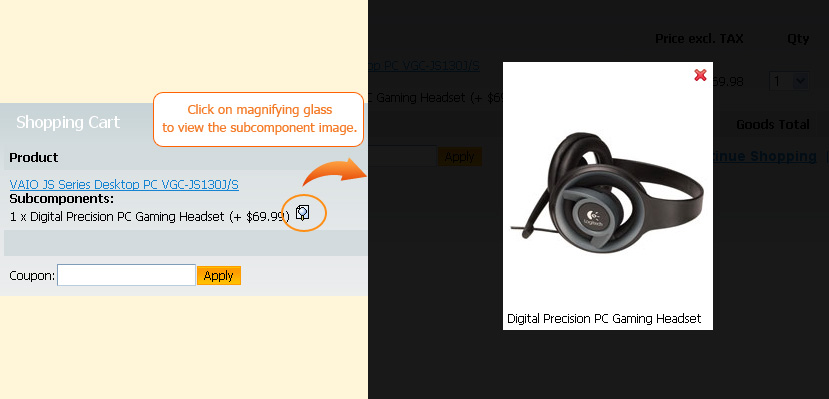
Please note, when you have added a subcomponent it will not show up on product listing or on product details pages, it will appear only on basket and checkout.
Subcomponent Selection: general settings
If you want to give your customers the possibility to choose from the available subcomponents list then you need to use Subcomponents Selection feature.
To add Subcomponent Selection go to Products >Products&Categories > Options&Components > Subcomponent Selection.
 On Edit Component Selection page you can find three tabs with various settings just like on Edit Option page.
In the General section fill in the following fields:
On Edit Component Selection page you can find three tabs with various settings just like on Edit Option page.
In the General section fill in the following fields:
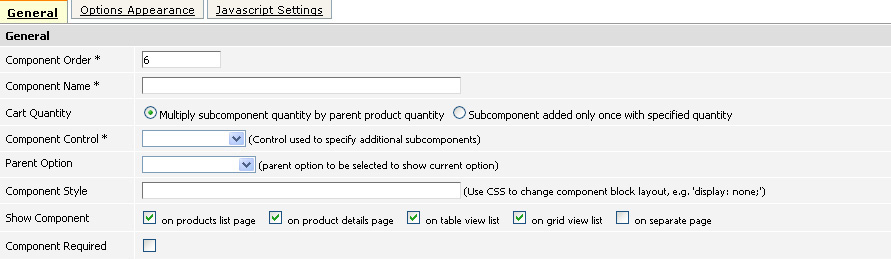
- Component Order - This indicates the position of this subcomponent selection among other subcomponent selections.
- Component Name - This is the name of this subcomponent selection. For example it could be: Support packages, Software add-ons, Accessories etc.
- Cart Quantity - This setting regulates how many subcomponents will be added with the basic product: you can either increase the number of subcomponents
along with each added product (Multiply subcomponent quantity by parent product quantity)
or make the number of subcomponents a fixed amount (Subcomponent added only once with specified quantity).
- Component Control - There are three choices of subcomponents display: Checkboxes List, ListBox
and Radio Buttons.
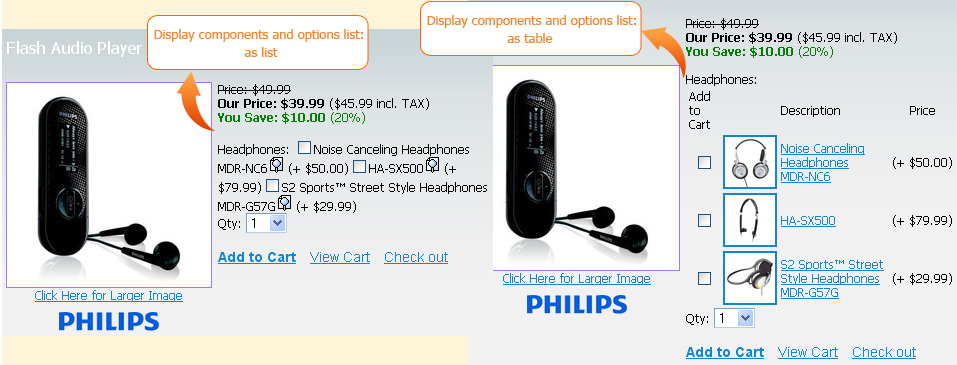
Note: subcomponents can be displayed either horizontally or vertically which depends on the Display components and options list setting in Products > Products Settings > Appearance tab.
- Parent Option - You can set up parent options or subcomponents for a Subcomponent Selection. In the drop down box you can see
all available components for the current product and make the Subcomponent Selection depend from one of them.
For example, if you sell gifts you can offer a gift card as an option ("Add gift
card?" -"Yes", "No") and accordingly for the parent option "Add gift card?", "yes"
value create a subcomponent selection of various gift cards.
- Component Style - By putting here CSS styles you can change the subcomponents' appearance.
For example, if you type 'border: 1px solid red;' there will appear a red border outside the subcomponent selection, if you type 'text-transform: uppercase;' the subcomponent selection's name and its values will appear in uppercase letters
etc.
Please note the tags entered here will be applied to the whole subcomponent selection.
If you want to customize only the appearance of subcomponent values you should use the 'Control Style' in the 'Options Appearance' section.
- Show Component - You can select the pages on which this subcomponent
selection will be
visible. Besides the product listing and product details page there are also available such
pages:
- On table view list - it is actually the product listing page but with Default View Type: table view (specified in CMS >
CMS Settings > Product Listing Page > Product Listing Page block).
- On grid view list - this is a new display of product listing page which is planned to implement soon.
- On separate page - this setting transfers customers who didn't select
a subcomponent on product listing page and clicked 'Add to Cart', to the
separate options page where they are to select a subcomponent.
The blocks for product_options.php page can be selected in CMS > CMS Settings > Product Options.
- On checkout process - this means the subcomponent selection will be available on order_info
page (first step of checkout).
Component Required - If this option is checked, then customers must choose one of the subcomponents in order to proceed with the purchase of this product.
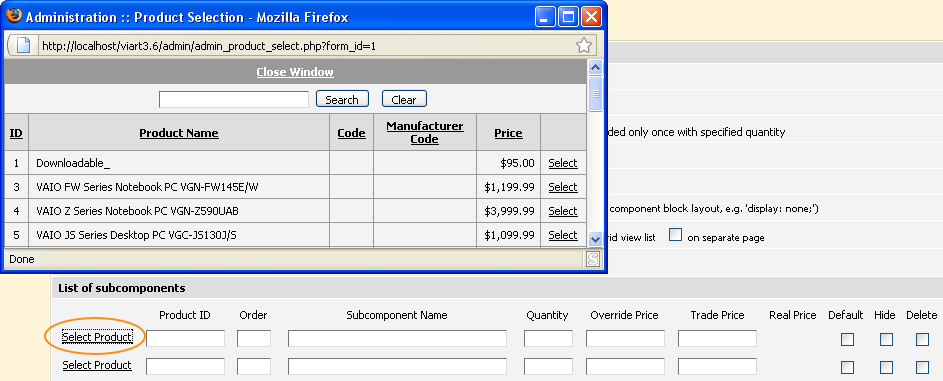
Subcomponent Selection: List of Subcomponents
In this section you can select subcomponent products. For this just click on Select Product link, select the
needed product from the pop-up window and system will auto-fill
all product information which includes Product ID, Subcomponent Name and Real Price. Alternatively you could type
this
information yourself.
 Order - This value defines the sorting order of the added components. If left blank system will sort subcomponents according to the order of their creation.
Quantity - This is the quantity of this subcomponent that goes with the product.
Override Price - You can write here your own price for this product as
subcomponent.
Trade Price - This price is shown to those users who have Trade Price activated in their User Type.
You can set some subcomponent/subcomponents to be selected by default by ticking Default checkbox or temporarily hide them ticking Hide checkbox.
Ticking Delete checkbox will correspondingly delete the value after you update the page.
To add more subcomponents click on the Add button.
In case you would like to delete the whole subcomponent selection click on Delete button.
Order - This value defines the sorting order of the added components. If left blank system will sort subcomponents according to the order of their creation.
Quantity - This is the quantity of this subcomponent that goes with the product.
Override Price - You can write here your own price for this product as
subcomponent.
Trade Price - This price is shown to those users who have Trade Price activated in their User Type.
You can set some subcomponent/subcomponents to be selected by default by ticking Default checkbox or temporarily hide them ticking Hide checkbox.
Ticking Delete checkbox will correspondingly delete the value after you update the page.
To add more subcomponents click on the Add button.
In case you would like to delete the whole subcomponent selection click on Delete button.
Options Appearance and Javascript Settings
The settings in those two tabs work absolutely the same as in Options feature (see section 18.6.3).
|
|
|

