|
|
|
This tutorial covers the following sections: Back to topOverviewIf you need to update or add newsletter users in bulk you may definitely need our exporting/importing feature. It is based on the .csv spreadsheet (this format can be selected in your Excel file). Back to topExport of newsletter users in ViArt ShopTo export newsletter users in ViArt Shop please do the following: 1. Login to your ViArt Shop Admin console. 2. Navigate to Administration > Site Users > Newsletter users. 3. Scroll down the page and you will see the export link: 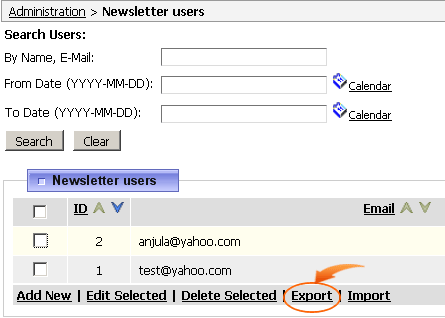 4. Click 'Export' and you will get to the page listing all newsletter user fields available for export. Enable the fields you want to export or use 'Select/Unselect All' option to select all fields at once: 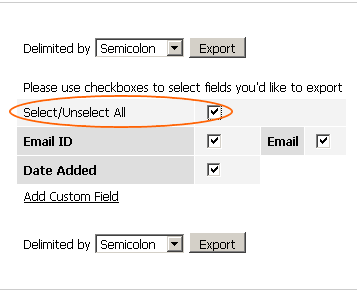 4. Next step is to define a format of your csv file. Presently, ViArt Shop supports 4 format types: delimited by comma, delimited by tab, delimited by semicolon and delimited by vertical bar. For more information on each type see section 39.2 5. Select a preferred format and click 'Export', then save the file 'va_newsletters_users.csv' to the place you wish. Open the file via your excel program to view or edit fields (if needed). The export of newsletter users is done. Back to topImport of newsletter usersTo import newsletter users please do the following steps: 1. Login to your ViArt Shop Admin console. 2. Navigate to Administration > Site Users > Newsletter users and scroll down the page where you will see the link 'Import':  3. Click 'Import' and you will get to the following page: 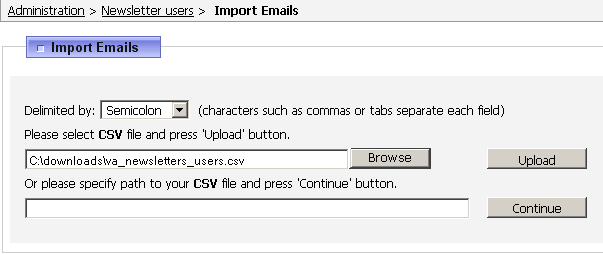 4. Select a format of the csv file you will import. Presently, ViArt Shop supports 4 format types: delimited by comma, delimited by tab, delimited by semicolon and delimited by vertical bar. For more information on each type see section 39.2. Important: Please, ensure that the format you select matches the format of your .csv file. 5. Once the format is selected you can move to upload your csv file. Select the file to upload by clicking Browse button and then 'Upload' to upload your csv file. Important: For large csv files we'd recommend to specify the path to the file in the second field 'Or please specify path to your CSV file and press the ''Continue' button'. It is recommended to use a local server path: i.e: /some_server_dir/upload.csv 6. If you select the format correctly and your csv file contains proper data, you will be forwarded to the next page where you should match a CSV Column with a relevant Database Column: 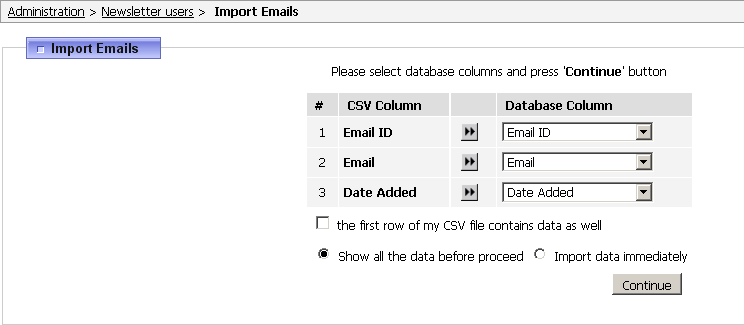 Generally a system automatically matches the columns but it may not recognise some of the columns. In this case you can select an appropriate Database column manually or simply select 'Ignore this column' to skip the column. 7. Select 'Show all the data before proceed' to preview the export report and errors (if any). You will be presented with the following page: 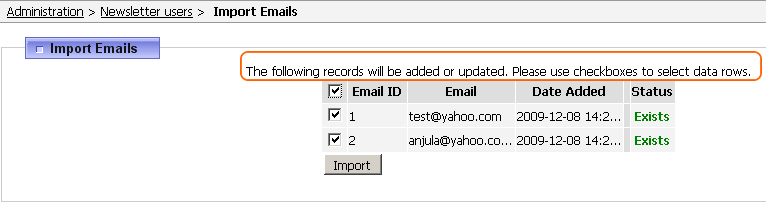 The system compares the existing set of emails with the data in the CSV file and generates a resulting table where every email is assigned one of the following statuses:
Note: emails with the 'Error' status won't be imported. You can either select to import all email addresses (by ticking the very first checkbox) or select email addresses one by one. Select 'Import data immediately' to skip the import report page. The drawback of this option is that you won't see the errors (if any) and you won't be able to select email addresses to import. Important: If you want to simply update email addresses a field Email ID is obligatory in your csv file, otherwise email addresses will be marked as New and will be added as new addresses. 8. Once email addresses are selected click 'Import' to proceed with import. You will be forwarded to the final page to view the importing result screen: 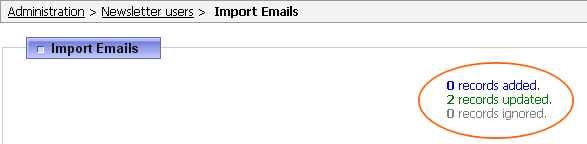 where records added - shows how many new email addresses were successfully added. records updated - shows how many existing email addresses were updated. records ignored - defines how many email addresses were not selected and imported. 9. Your import is now completed. Navigate to Administration > Site Users > Newsletter users to view new or updated users. |
|
|

